
If choosing just one polish shade feels impossible, skittle nails give you the perfect reason to stop trying. Instead of repeating one color across every finger, this playful manicure turns your hands into a carefully coordinated palette where each nail gets its own personality.
While the basic idea sounds simple, today’s versions go far beyond painting your fingers in standard rainbow order. Nail artists are experimenting with translucent jelly finishes, contrasting warm and cool tones, dimensional gel textures, negative space, unusual French tips, glitter, and unexpected color combinations. Some interpretations are unapologetically bright, while others use muted shades and sophisticated finishes for a more wearable result.
What makes this manicure especially interesting is that your chosen colors don’t necessarily need to match. The finished look can feel cohesive because the shades share a similar undertone, intensity, finish, or overall mood. Dusty pink, muted orange, olive green, smoky blue, and soft plum, for example, can create a completely different effect from a vivid candy-colored palette while still following the same concept.
This freedom makes skittle nails easy to personalize around your wardrobe, favorite season, mood, or existing polish collection. You can make the manicure playful, sophisticated, nostalgic, futuristic, or completely unexpected without losing the defining multicolored effect.
Below are ten distinctive ways to wear the trend while moving beyond the most predictable rainbow combinations.
Why Skittle Nails Are Taking Over Right Now
One reason this manicure continues to stand out is its connection to personalization. Instead of following a strict formula, you can build a palette that reflects exactly what you want your nails to feel like.
Maybe that means combining colors you already wear constantly. Maybe it’s five shades inspired by summer fruit, a sunset, vintage fashion, or jewel tones. You can even create a gradient using different versions of the same color if contrasting hues aren’t your style.
Cohesion is what separates an intentional multicolored manicure from five random bottles of polish.
Pastels naturally coordinate because they share softness. Jewel tones work together through their richness. Neons have similar intensity, while dusty colors feel connected through their muted finish. Texture can also provide cohesion: completely different shades suddenly feel related when every finger has the same jelly transparency, glossy surface, shimmer, or metallic finish.
The concept is also flexible enough for different skill levels. Beginners can recreate it simply by painting each finger a different color, while experienced nail artists can incorporate gradients, raised builder-gel details, patterns, and intricate French designs.
That’s why skittle nails can look different every time you wear them without losing the playful identity that makes the trend recognizable.
1. Hot and Cold Color Split Nails
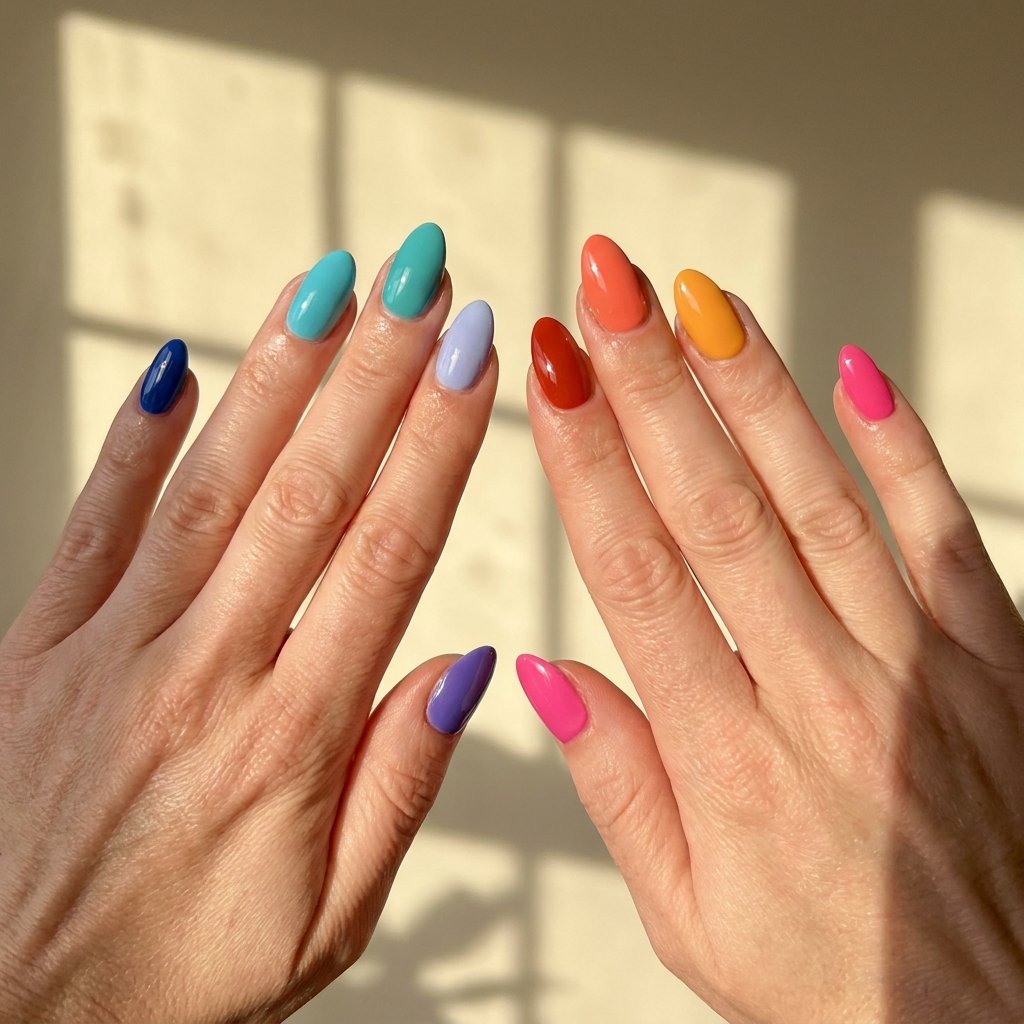
Instead of arranging different shades in predictable rainbow order, create deliberate contrast by separating your manicure into warm and cool color families.
One hand can lean toward heat with tomato red, coral, burnt orange, terracotta, and golden yellow. The other can shift toward cobalt, turquoise, icy lavender, teal, and deep ocean blue. Viewed together, the opposing palettes create an energetic contrast that immediately makes the manicure more memorable.
The secret is keeping the saturation levels connected. If your warm shades are bright and vivid, your cooler colors should have similar intensity. Pairing neon orange with extremely dusty blue, for example, can make the palette feel disconnected unless that contrast is intentional.
You can also break the rules slightly by moving one cool shade onto the warm hand and one warm shade onto the cool hand. This small crossover visually connects the two sides while preserving the overall hot-versus-cold concept.
Short square and softly rounded nails make the colors feel clean and modern, while elongated almond nails give the same palette a more editorial quality. If you’re experimenting with the look yourself, choosing shades from a Coordinated Multi-Color Nail Polish Set can make it easier to find colors with similar opacity and intensity without having to build the entire palette individually.
Style Insight: Focus on matching color intensity rather than matching the actual hues. Equal saturation makes opposing shades look surprisingly cohesive.
Who It Suits: Color lovers who want a more creative alternative to a traditional rainbow manicure.
When to Wear: Summer holidays, festivals, creative events, weekend trips, concerts, and occasions where your manicure can become part of your overall outfit.
2. Jelly Glitter Skittle Nails

Translucent candy colors and floating sparkle make jelly glitter one of the most playful ways to interpret skittle nails.
Instead of completely opaque polish, imagine transparent raspberry, tangerine, lime, aqua, grape, and cherry shades. The natural nail remains slightly visible beneath the color, giving each finger a light-catching, almost glass-like appearance.
The glitter adds another layer of depth.
Fine reflective particles create a delicate shimmer, while larger pieces of glitter or confetti can appear suspended within the translucent color. Nail artists can create an especially dimensional result by applying a thin jelly layer, adding glitter, and then sealing it beneath another sheer coat. Rather than sitting obviously on the surface, the sparkle looks as though it is floating inside the nail.
You can also vary the glitter concentration from finger to finger. One nail might contain only a scattering of sparkle while another has a denser confetti effect. Because the translucent finish remains consistent, the manicure still feels connected.
This style looks beautiful on almond and oval shapes, where curved edges enhance the candy-like appearance, but it also works surprisingly well on shorter natural nails.
When recreating the effect at home, sealing the final layers with a High-Shine Gel Top Coat helps smooth over glitter texture while enhancing the transparent, glassy finish that makes jelly polish so distinctive.
Style Insight: Apply jelly polish in thin layers. Too many heavy coats can hide the transparency and make the design look like ordinary opaque glitter polish.
Who It Suits: Anyone who loves playful color but prefers something lighter and more dimensional than a completely solid manicure.
When to Wear: Spring weekends, beach trips, summer vacations, concerts, birthdays, festivals, and colorful seasonal looks.
3. Polka Dot Color-Mix Nails
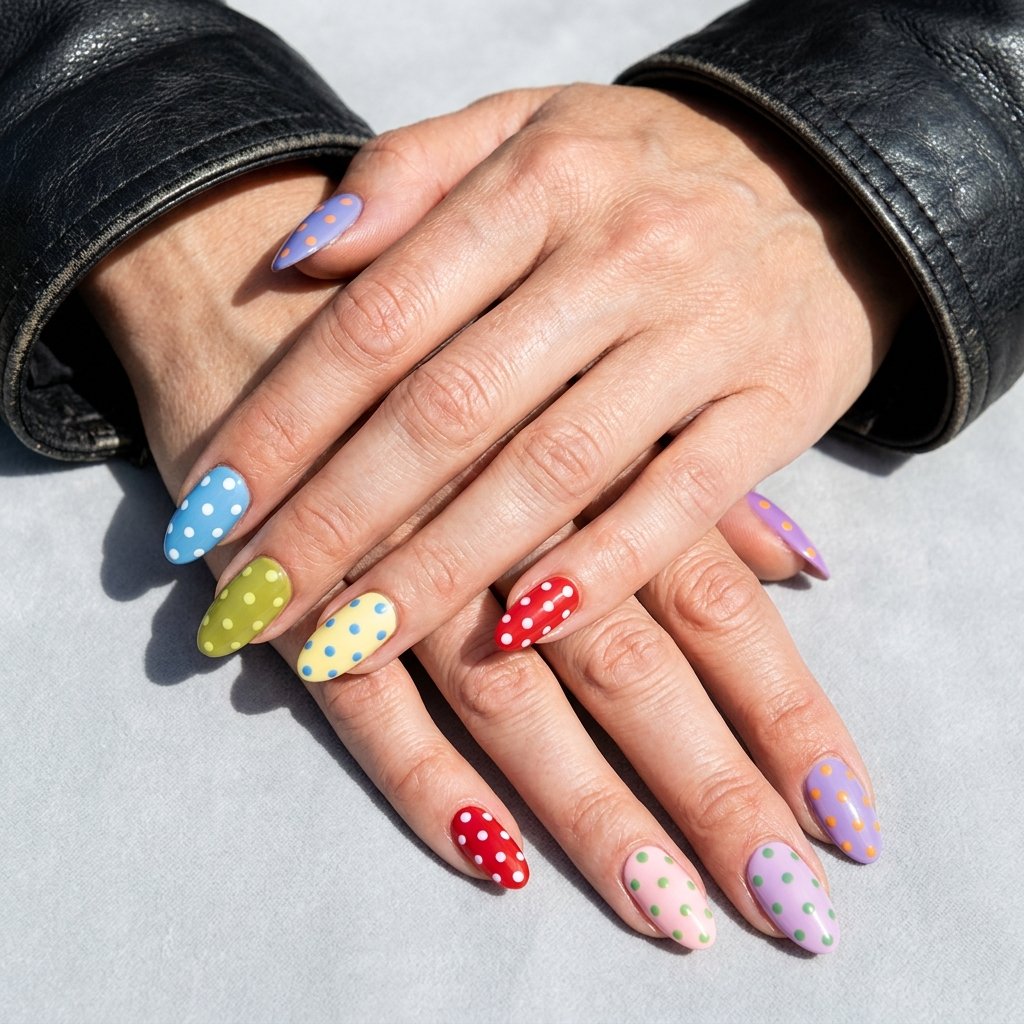
Polka dots give a multicolored manicure a retro twist while remaining relatively easy to recreate.
Begin with several coordinated base colors, but instead of decorating every nail with identical white or black dots, reuse shades from your existing palette. A coral nail might feature pale yellow dots, lavender could be paired with green, and turquoise could receive pink detailing.
Repeating those same colors on different fingers creates visual continuity.
For example, if one nail has an orange base with pink dots, another can reverse the combination with pink polish and orange dots. The nails aren’t identical, but the repeated shades make the whole design look intentionally connected.
The size of the dots also changes the mood. Tiny evenly spaced dots feel delicate and slightly vintage, while larger circles create a bolder, graphic effect. You can even leave a little more negative space between them if you want the base colors to remain dominant.
Precision matters more than complexity with this design. A regular polish brush can create uneven circles, whereas a Nail Art Dotting Tool Set allows you to control the size and placement of each dot so the pattern looks cleaner while still retaining that playful hand-painted quality.
Style Insight: Keep the approximate dot size and spacing consistent even when the color combinations change. The repeated pattern provides structure to the varied palette.
Who It Suits: Fans of retro styling, playful manicures, colorful fashion, and nail art that doesn’t feel overly complicated.
When to Wear: Brunches, spring outings, casual weekends, vacations, birthday parties, and everyday looks that need a little extra personality.
4. 3D Swirl Ombré Skittle Nails

For a more artistic interpretation, combine a multicolored gradient with transparent raised swirls.
Each finger begins with its own ombré combination. One nail might fade from pink into peach, another from yellow into lime, while the remaining fingers move through violet, turquoise, coral, or blue. Instead of creating five unrelated gradients, repeat at least a few colors across neighboring nails so the palette flows naturally from finger to finger.
Then comes the dimensional detail.
Clear builder gel can be applied in curved, flowing lines across the finished gradient. Once cured, these raised swirls catch light differently from the smooth polish beneath them, producing a rippled-glass effect that changes as the hands move.
The transparent texture is what keeps this design from becoming visually overloaded. The colorful gradient provides the main statement, while the clear raised lines add dimension without introducing another competing shade.
You can make the swirls thin and delicate for a subtle wet-look texture or slightly thicker for a more obvious sculptural finish. Almond and medium-long oval nails provide enough space for the curves to travel naturally across the nail plate.
This is one of the more salon-oriented designs in the collection because clean gradients and controlled builder-gel placement require precision, but the finished manicure offers much more depth than a conventional multicolored ombré.
Style Insight: Keep the raised gel transparent. Clear dimensional lines allow the gradient underneath to remain the focus while creating texture through reflected light.
Who It Suits: Nail-art enthusiasts who prefer creative, editorial designs and aren’t afraid of dimensional details.
When to Wear: Vacations, music festivals, fashion events, summer parties, photoshoots, and occasions where you want your manicure to become a conversation starter.
5. Negative Space Color Block Skittle Nails
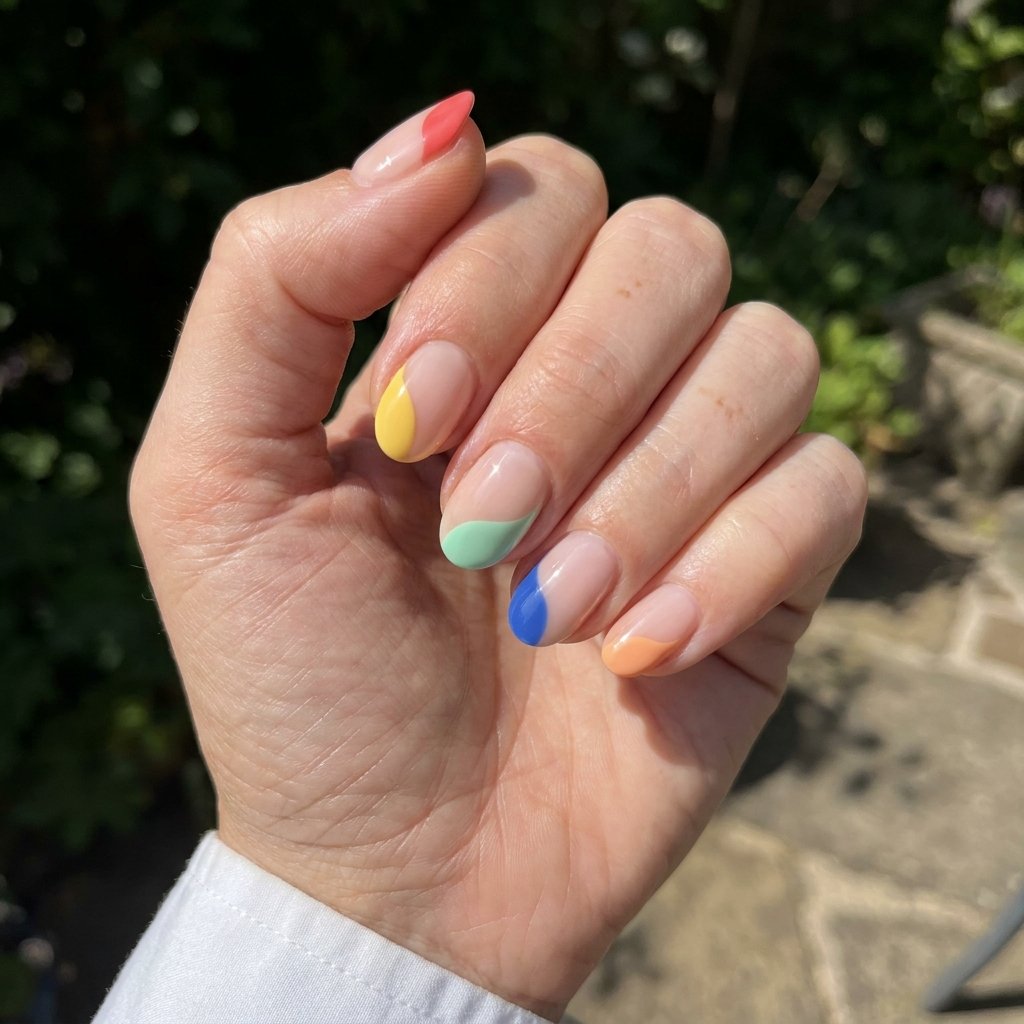
If full-coverage rainbow polish feels too bold, negative space provides a cleaner way to experiment with multiple colors.
This design leaves sections of the natural nail visible while placing blocks of contrasting color around them. One finger might feature coral near the cuticle and violet across the tip, while another combines lime with turquoise or pink with orange.
The unpainted sections act almost like breathing room between the stronger shades.
Instead of every nail becoming a solid block of color, the natural base helps the manicure feel lighter and more graphic. It also creates an interesting geometric quality, particularly when the painted sections use crisp curved or diagonal edges.
A sheer nude base can be used instead of leaving the natural nail completely bare. This creates a more polished foundation while maintaining the illusion of negative space.
For the strongest result, vary the color combinations but repeat the placement style. If each nail has a colored cuticle section and a contrasting tip, for example, that consistent structure will connect the entire manicure even though no two fingers use the same palette.
This version of skittle nails proves that multicolored doesn’t automatically mean maximalist. With carefully controlled negative space, several vivid shades can actually feel clean, contemporary, and surprisingly sophisticated.
Style Insight: Keep the negative-space areas consistent across your fingers. Repeating the same amount of exposed nail gives different color combinations a unified structure.
Who It Suits: Minimalist nail lovers who want to experiment with brighter shades without covering the entire nail.
When to Wear: Creative workplaces, city weekends, gallery visits, spring and summer outings, or anytime you want colorful nail art with a cleaner finish.
6. Polly Pocket-Inspired Color Mix Nails
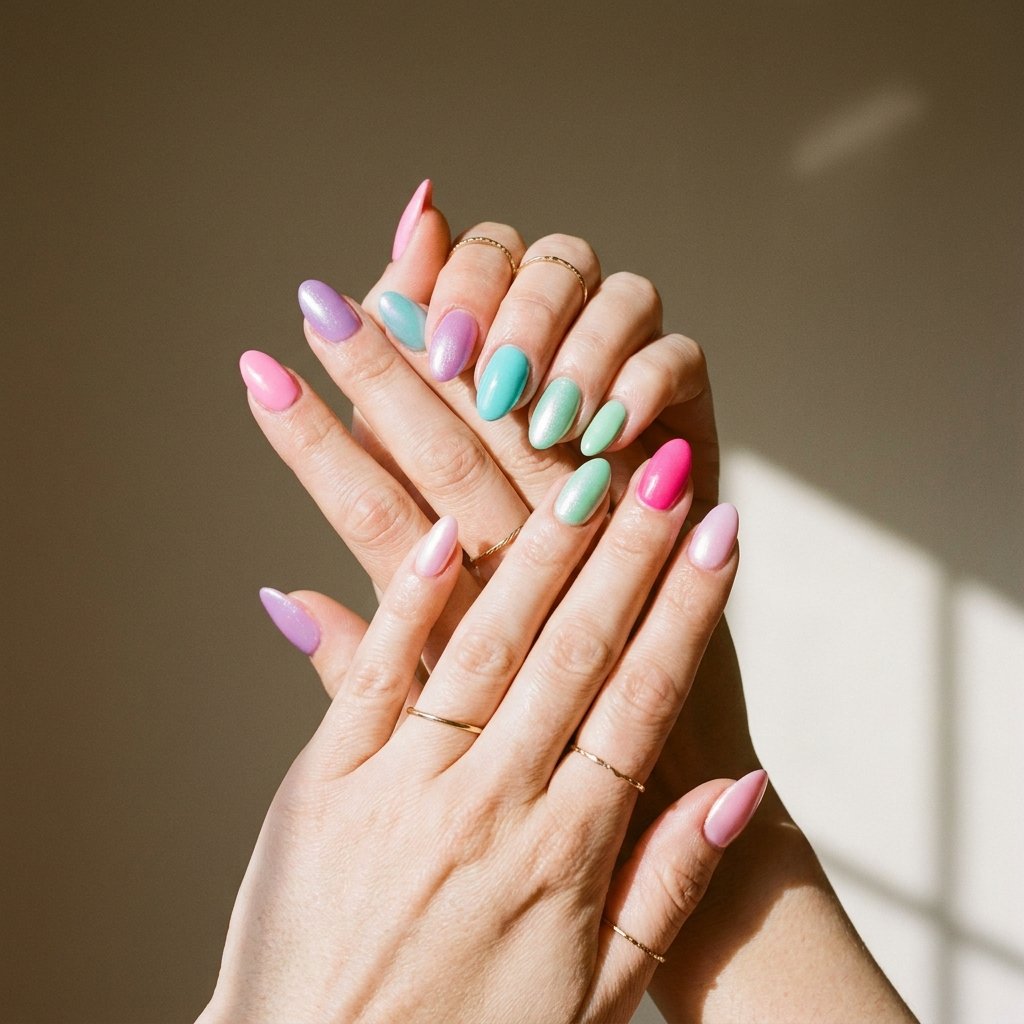
Nostalgic color combinations are an easy way to make a multicolored manicure feel distinctive, and a Polly Pocket-inspired palette brings playful ’90s energy without requiring literal character artwork.
Think bubblegum pink, bright purple, aqua, turquoise, lilac, and touches of creamy pastel. These shades immediately create a cheerful toy-box color story, but the manicure becomes much more interesting when you vary the finishes rather than painting every nail in the same glossy formula.
One finger could feature creamy pink polish, another a translucent aqua jelly, while purple appears with subtle shimmer. You can even introduce a pearlescent finish on one or two nails to recreate the shiny plastic quality associated with nostalgic accessories.
The key is inspiration rather than imitation. You don’t need tiny illustrations, logos, or complicated drawings for the theme to work. The recognizable combination of saturated pinks, purples, and blue-greens already creates that playful retro mood.
Short rounded nails make the palette feel cute and casual, while medium almond nails give it a more contemporary beauty-editorial finish. Keeping every surface extremely glossy also prevents the nostalgic colors from appearing flat.
Style Insight: Mix two or three finishes within the same palette, but repeat at least one finish on several fingers so the manicure still looks coordinated.
Who It Suits: Anyone who loves nostalgic beauty, playful color palettes, and ’90s-inspired fashion.
When to Wear: Birthday celebrations, summer vacations, amusement park trips, casual weekends, and colorful spring or summer outfits.
7. Cobalt Contrast Skittle Nails
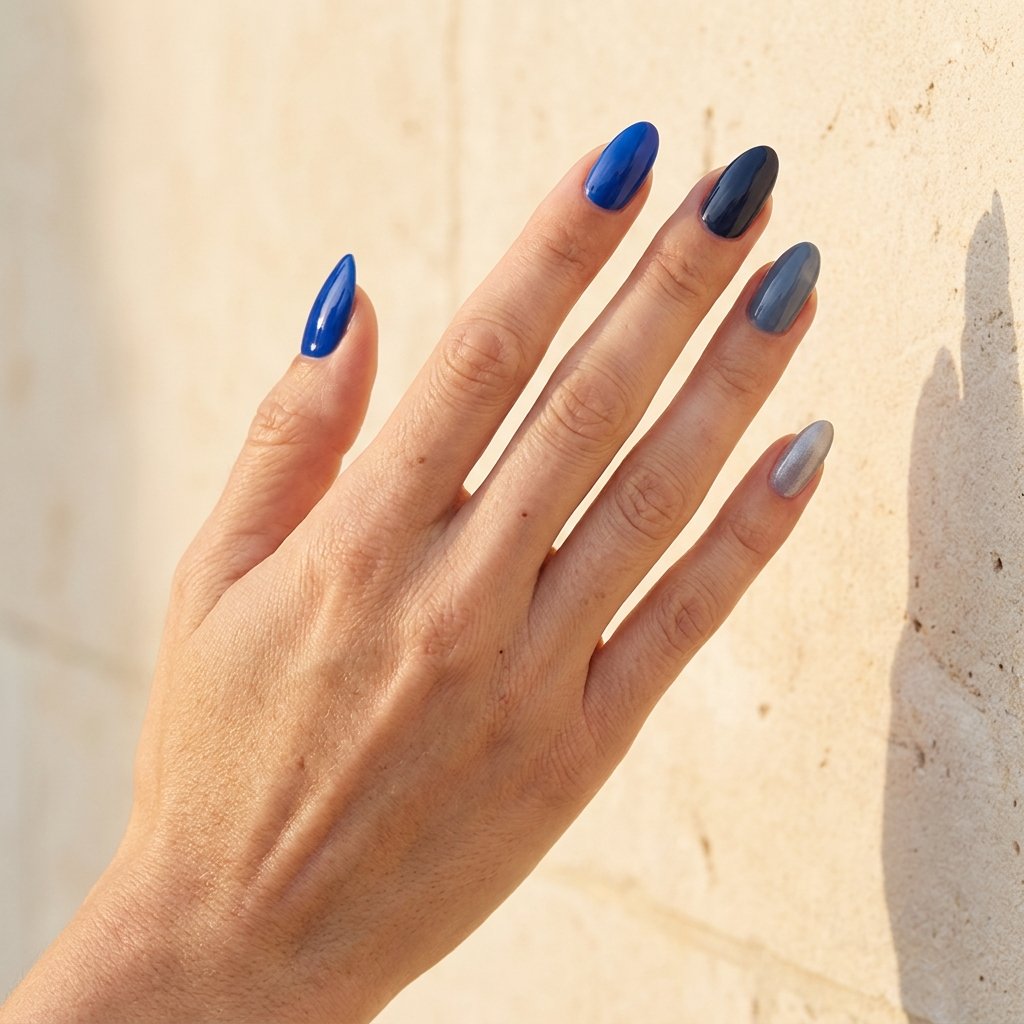
Not every colorful manicure needs every shade of the rainbow. Limiting the palette can actually make skittle nails look more sophisticated.
Cobalt blue is particularly effective when paired with quieter shades such as slate gray, smoky blue, soft silver, charcoal, and deep navy. Rather than competing with the electric blue, these muted colors allow it to become the visual focal point.
Try placing cobalt on one or two strategic fingers while gradually moving through darker and softer tones across the remaining nails. The manicure still follows the different-color concept, but the restricted palette makes the overall effect feel intentional and polished.
Texture can add another dimension. A creamy cobalt polish next to a subtle silver shimmer or glossy navy creates enough variation to distinguish each finger without losing the carefully controlled color story.
This approach also demonstrates an important principle of multicolored manicures: every shade doesn’t need equal visual weight. Sometimes one standout color looks more effective when the others act as supporting tones.
If you’re working with highly saturated colors like cobalt, applying a Protective Base Coat for Bold Nail Colors before your polish can create a smoother foundation while helping prevent intense pigments from staining the natural nail.
Medium square nails give the palette a crisp, modern appearance, while almond shapes soften the contrast and make the darker colors feel slightly more elegant.
Style Insight: Let cobalt be the hero shade. Surrounding it with smoky neutrals and deeper blues makes the brighter color look even more intense.
Who It Suits: Anyone who likes colorful manicures but prefers controlled palettes over full rainbow combinations.
When to Wear: City outings, dinner dates, creative workplaces, transitional seasons, and evenings when you want a bold manicure that still feels refined.
8. Two-Tone Outlined French Skittle Nails
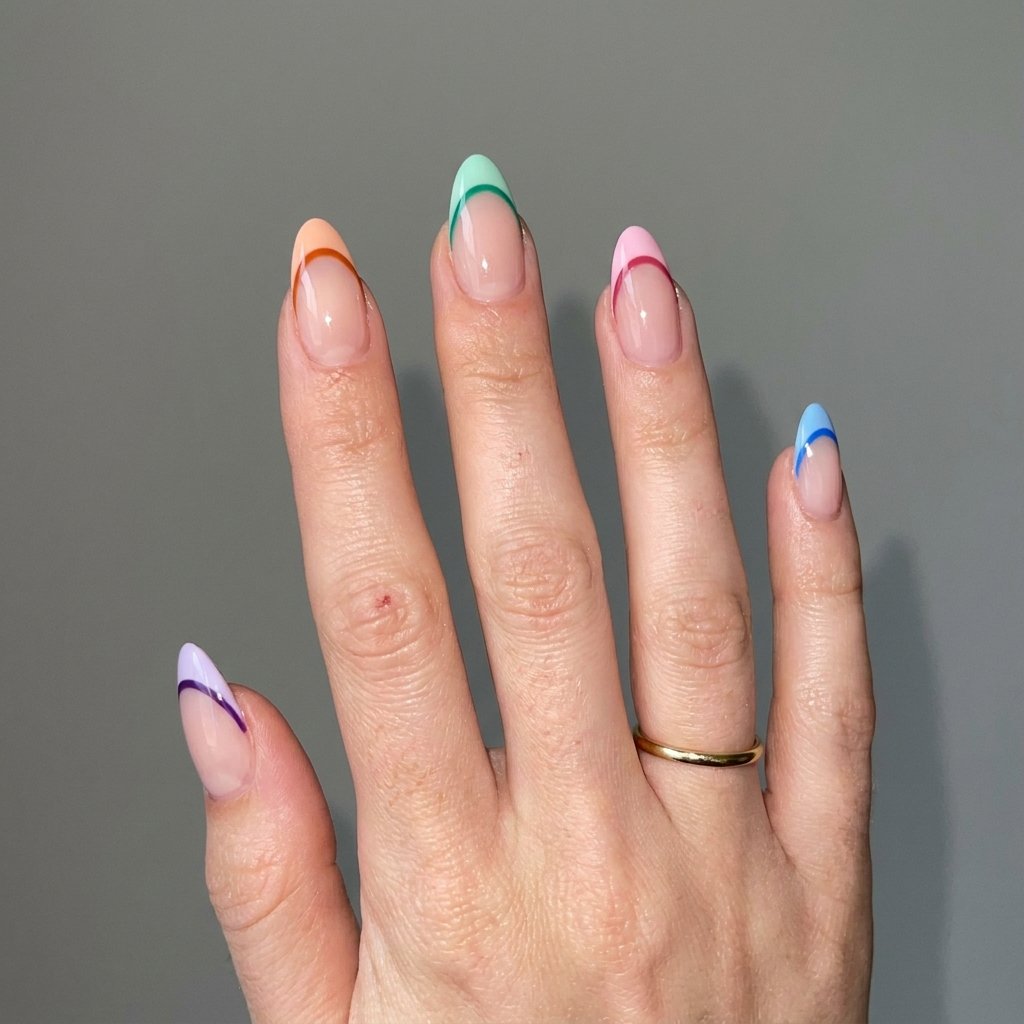
A traditional French manicure relies on consistency, but this version intentionally breaks that rule.
Begin with a sheer nude or softly milky base. Instead of painting every tip white, give each finger its own color, perhaps coral, violet, teal, pink, and orange. Then outline each French tip with a deeper coordinating shade.
For example, a pale pink tip could receive a raspberry outline, mint could be edged in emerald, lavender with deep purple, and peach with burnt orange. That second line makes the design feel much more graphic than an ordinary colorful French manicure.
The contrast also emphasizes the shape of the tip.
On almond nails, follow the natural curve to create an elongated, elegant effect. Square nails work particularly well with slightly thicker tips and crisp outlines, while shorter nails benefit from thinner lines that preserve more of the sheer base.
The beauty of this design comes from repetition. Every finger can use completely different colors because the French placement and darker outline remain consistent across the manicure.
You can also adjust the mood through color selection. Pastel combinations make the design soft and playful, jewel tones create a richer finish, and vivid contrasting shades push it toward maximalist nail art.
Style Insight: Choose an outline color that is noticeably darker than the tip but still related to it. The difference should be visible without making the two shades feel disconnected.
Who It Suits: French manicure fans who want something more artistic than conventional white tips.
When to Wear: Brunches, vacations, spring events, birthday celebrations, date nights, and occasions when a classic manicure needs more personality.
9. Two-Tone Jelly Skittle French Tips
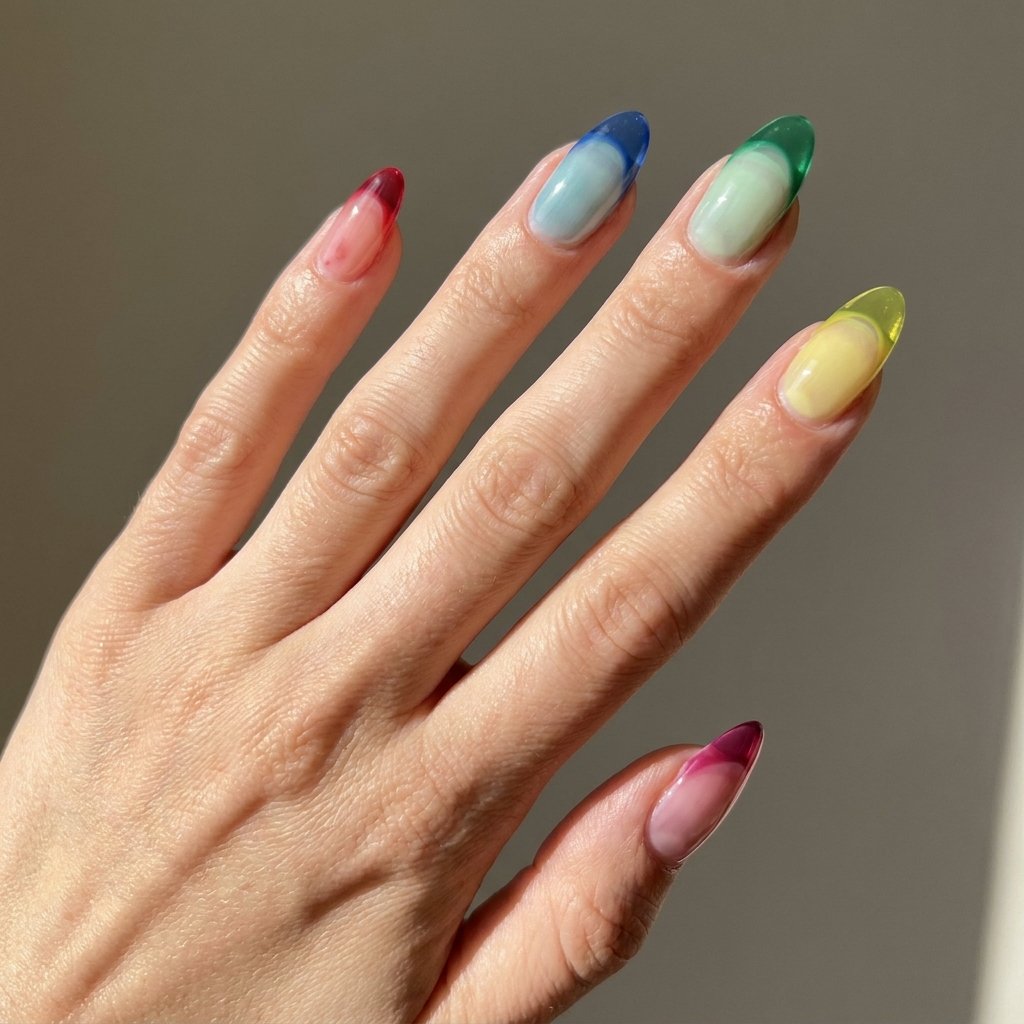
If outlined French tips feel graphic, translucent jelly French tips offer a softer interpretation.
The idea uses two related sheer colors on each finger. A light translucent shade covers the main nail, while a deeper jelly color defines the French tip. Because both layers remain slightly transparent, the transition looks juicy and dimensional rather than heavy.
Imagine a pale strawberry base with a cherry-red tip, soft peach beneath translucent orange, light lavender paired with grape, or watery aqua finished with a deeper teal edge.
Each nail can follow a different color family while repeating the same light-base-and-dark-tip formula.
This consistency is what makes the manicure work. Although the colors shift from finger to finger, your eye recognizes the repeated structure immediately. It feels coordinated without requiring identical shades.
Jelly formulas are especially beautiful on oval and almond nails because light can visually travel through the translucent edges. A high-gloss finish intensifies the effect, giving the manicure a smooth, almost syrup-like surface.
For an at-home version, thin layers matter. Start with a sheer wash of color rather than trying to achieve full opacity. Then build the tip gradually with a small Fine Nail Art French Tip Brush so you can control the curved edge without covering too much of the translucent base.
This is also an excellent option if you love colorful nail art but don’t want every finger covered in heavy opaque polish.
Style Insight: Use a lighter and darker version of the same color family on each nail. That relationship keeps the two-tone French effect easy to read.
Who It Suits: Fans of sheer polish, modern French manicures, glossy finishes, and softer interpretations of colorful nail trends.
When to Wear: Spring and summer, beach vacations, daytime celebrations, weekend trips, and everyday looks that call for something fresh.
10. Sunwashed Tie-Dye Skittle Nails

For the final design, take vibrant color and deliberately soften it.
Sunwashed skittle nails use faded versions of pink, peach, lemon, lime, lavender, and blue to create a manicure that looks almost as though bright pigment has been gently bleached by summer sunlight.
Instead of clean blocks of color, the shades can blur softly into one another. One finger might fade between peach and pale yellow, while another moves from lavender into washed blue. Pink can dissolve into soft orange, and muted lime can meet creamy yellow.
The result sits somewhere between watercolor, tie-dye, and a faded vintage print.
Keeping the transitions slightly imperfect is part of the charm. Rather than creating a mathematically precise ombré, allow the colors to diffuse naturally so the manicure feels relaxed and organic. A sheer or milky base underneath can soften saturated polish and help create that sun-faded appearance.
This style works beautifully on short natural nails because the blurred color doesn’t depend on length to make an impact. On longer almond nails, however, there is more room for several tones to melt together.
A glossy top coat gives the faded colors a fresh finish, while a soft satin surface can push the design even further toward a vintage-inspired look.
Style Insight: Avoid using every shade at full saturation. The slightly faded quality is what separates this design from ordinary rainbow ombré.
Who It Suits: Anyone drawn to relaxed summer aesthetics, watercolor effects, vintage-inspired color, and softer statement manicures.
When to Wear: Beach holidays, summer weekends, music festivals, poolside vacations, outdoor parties, and warm-weather getaways.
Which Skittle Nail Design Matches Your Energy?
The best thing about this trend is that there isn’t one correct way to wear it.
If you gravitate toward bold contrasts, the hot-and-cold color split or cobalt combination gives your manicure a strong visual identity. Jelly glitter and two-tone jelly French tips are better suited to anyone who prefers translucent, light-catching finishes.
For playful personalities, polka dots and nostalgic Polly Pocket-inspired colors bring plenty of personality without needing extremely complicated artwork. If your taste leans more artistic, dimensional swirl ombré and sunwashed tie-dye effects turn every fingertip into a miniature color study.
Minimalists aren’t excluded either. Negative-space color blocking allows vivid shades to breathe, while an outlined French manicure provides structure through repeated placement.
That’s ultimately why skittle nails are so easy to personalize. The defining idea isn’t a specific shade, nail length, or pattern. It’s the freedom to let individual fingers look different while finding one visual detail that connects the entire manicure.
Choose colors that feel like you, then decide whether cohesion will come from finish, saturation, undertone, pattern, or technique.
Frequently Asked Questions
What are skittle nails?
They are a multicolored manicure style in which individual nails are painted or decorated differently rather than repeating exactly the same color across every finger. The shades can form a rainbow, remain within one color family, contrast intentionally, or incorporate different finishes and nail-art techniques.
Do all the colors need to match?
No. In fact, some of the most interesting combinations use contrasting shades. The important part is creating a visual connection. Similar saturation, undertones, finishes, or repeated design elements can make very different colors feel cohesive.
For example, orange, purple, blue, green, and pink may seem unrelated, but if every shade has the same muted intensity and glossy finish, the palette can still look thoughtfully coordinated.
Can I wear this manicure on short nails?
Absolutely. Short nails are particularly well suited to solid multicolored polish, polka dots, negative space, and jelly finishes. You don’t need long acrylics to make the color variation noticeable.
If your natural nails are very short, keeping artwork relatively simple can help each individual shade remain visible rather than overcrowding the nail plate.
How do I choose colors for a Skittle manicure?
Start by deciding on a mood rather than immediately choosing individual bottles.
For something soft, build around dusty or pastel colors. For a bold summer look, select several equally saturated brights. If you prefer sophistication, combine jewel tones, smoky shades, or several variations of one color family.
You can also choose one hero color first and build the remaining palette around it. Cobalt, for example, can be supported by navy, gray, silver, and smoky blue instead of four equally intense contrasting colors.
Can I recreate the trend at home?
Yes. The simplest version only requires several polish shades, a base coat, and a top coat. Paint each nail a different color while keeping the finish consistent.
More intricate designs such as outlined French tips, polka dots, or jelly effects may require a fine brush or dotting tool, while dimensional builder-gel artwork is usually easier with salon equipment and experience.
If you’re new to multicolored manicures, start with five coordinated solid shades before experimenting with detailed patterns and textures.
Ready to Try Skittle Nails?
A manicure doesn’t have to choose between playful and polished. With the right palette, several completely different colors can work together beautifully while giving every finger its own personality.
Whether you love translucent jelly glitter, contrasting hot-and-cold palettes, retro polka dots, sculptural gel swirls, colorful French tips, nostalgic combinations, or softly faded tie-dye effects, skittle nails give you room to experiment without following one rigid formula.
The secret is finding a connection between your colors. Keep the saturation consistent, repeat a finish, stay within related undertones, or use the same pattern across different shades. Once that visual thread is established, even unexpected combinations can feel intentional.
Save the designs that match your style, experiment with your favorite color combinations, and show your favorites to your nail artist when you’re ready for a manicure where no two fingers have to look exactly alike.
Hi, I’m Amber, the creator behind Dazzle Me Nails. I started this site because I’ve always believed nails aren’t just about beauty, they’re about confidence, self expression, and feeling put together in the simplest way. Like many of you, I’ve struggled with weak nails, chipped polish, and designs that looked good online but didn’t work in real life. That’s why I created Dazzle Me Nails to share nail ideas that are practical, wearable, and easy to recreate.
Here, you’ll find minimalist nail designs, trend inspired looks, and simple nail care tips to help you achieve clean, polished nails without over complicating your routine. If you love soft, classy, and effortless nail styles, you’re in the right place.