
The jelly manicure is the nail trend that has completely taken over summer 2026, and once you see that luminous, glass-like finish in person, it’s impossible not to want it on your own hands. The good news? You don’t need a salon appointment, a UV lamp, or any special nail art skills to pull it off beautifully. In this tutorial, Amber walks you through every step, every shade worth trying, and the one technique secret that takes your glossy jelly nails from pretty to genuinely stunning.
First, What Actually Makes a Jelly Manicure “Jelly”?
Good question, because “jelly” gets thrown around a lot and it’s worth knowing what you’re actually going for.
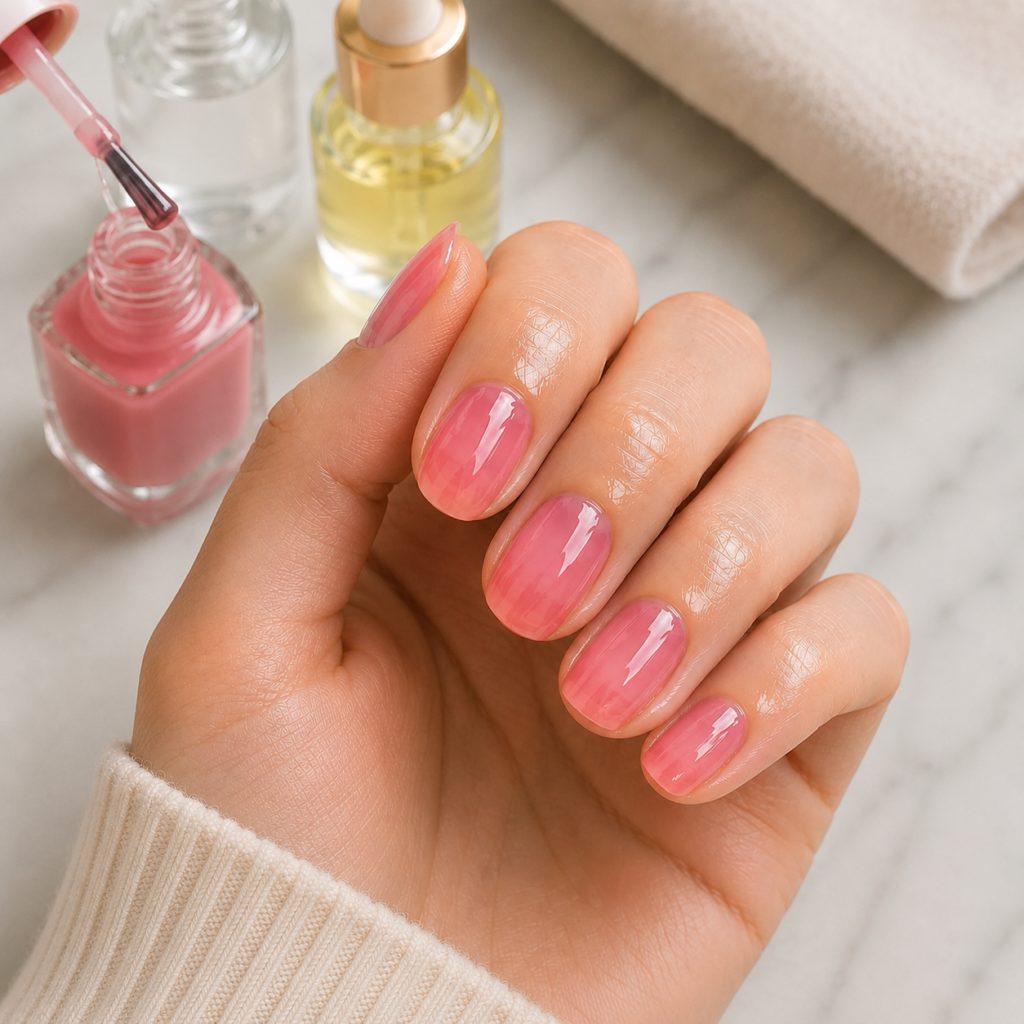
A jelly manicure is defined by its finish, not its color. You’re looking for three things: sheerness (some nail showing through), depth (a slightly three-dimensional, rounded look rather than flat), and high gloss (wet, reflective, almost lacquered). Together, those three qualities create that signature “my nails but better” effect, like your nails are naturally this beautiful, not like you spent twenty minutes painting them.
The sheer part is key, and it’s also where people most often go wrong. If you pile on enough coats to make the color fully opaque, you’ve lost the jelly. The whole point is the translucency. Lean into it.
The Shade Guide for Glossy Jelly Nails: What Works and What Doesn’t
Not every color translates into a good jelly. Darker, more pigmented shades lose the effect entirely. What you want are colors that are inherently sheer or can be worn sheer, and right now, the options are stunning.
- Milky pink: The classic. Universally flattering, quietly elevated, the kind of shade that makes your hands look like they belong on a cashmere campaign. It’s the jelly manicure’s founding color and still one of the best.
- Sheer coral: Summer in a bottle. Warm, sun-kissed, pairs with literally everything in your warm-weather wardrobe.
- Translucent cherry: For when you want a little more drama without fully committing. Still wearable, still polished, but with a slight edge.
- Sorbet peach: Having a serious moment right now, soft, sweet, and somehow both retro and completely fresh at the same time.
- Sea-glass blue: The wildcard pick. It sounds bold but it wears surprisingly soft, especially in a sheer formula.
- Coconut white: Almost clear, barely-there, the most “your nails but ethereal” option of the bunch. Underrated.
The rule: If you hold the bottle up to light and can see through it at all, you’re probably in jelly territory. If it’s fully opaque, keep looking.
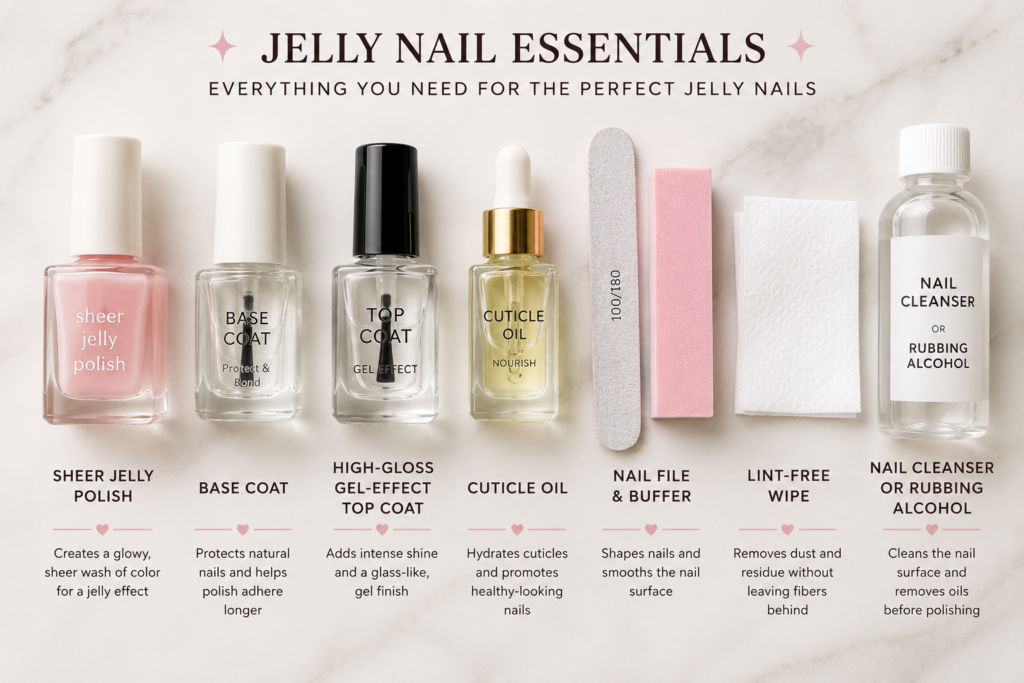
What You’ll Need for the Perfect Jelly Nail Look
You don’t need much. That’s part of what makes this trend so satisfying.
- A sheer jelly polish (or a regular sheer/translucent shade you already own)
- Base coat, don’t skip this
- High-gloss, gel-effect top coat, this is genuinely the most important product on this list
- Cuticle oil
- Nail file and buffer
- A lint-free wipe and nail cleanser or rubbing alcohol
A word on top coat: The glossier, the better. This is not the place for a matte finish or a quick-dry that leaves a slightly satin result. You want something that looks wet even after it dries.
The Step-by-Step Jelly Manicure Tutorial
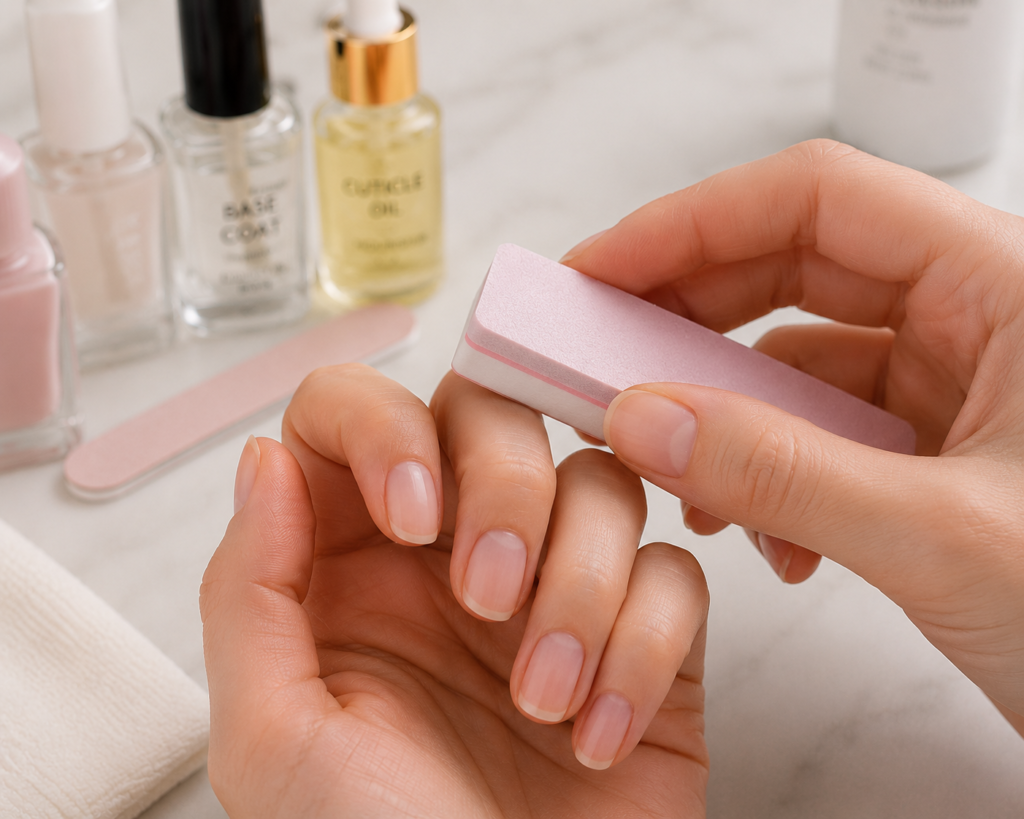
Step 1: Shape and Prep (Don’t Rush This)
File your nails to your preferred shape. Right now, short square and soft oval are both enormous, both work perfectly with the jelly look. After filing, buff the surface lightly to smooth out any ridges. Then push back your cuticles gently. Finish prep by wiping each nail with a lint-free pad soaked in rubbing alcohol or nail cleanser to remove oils.
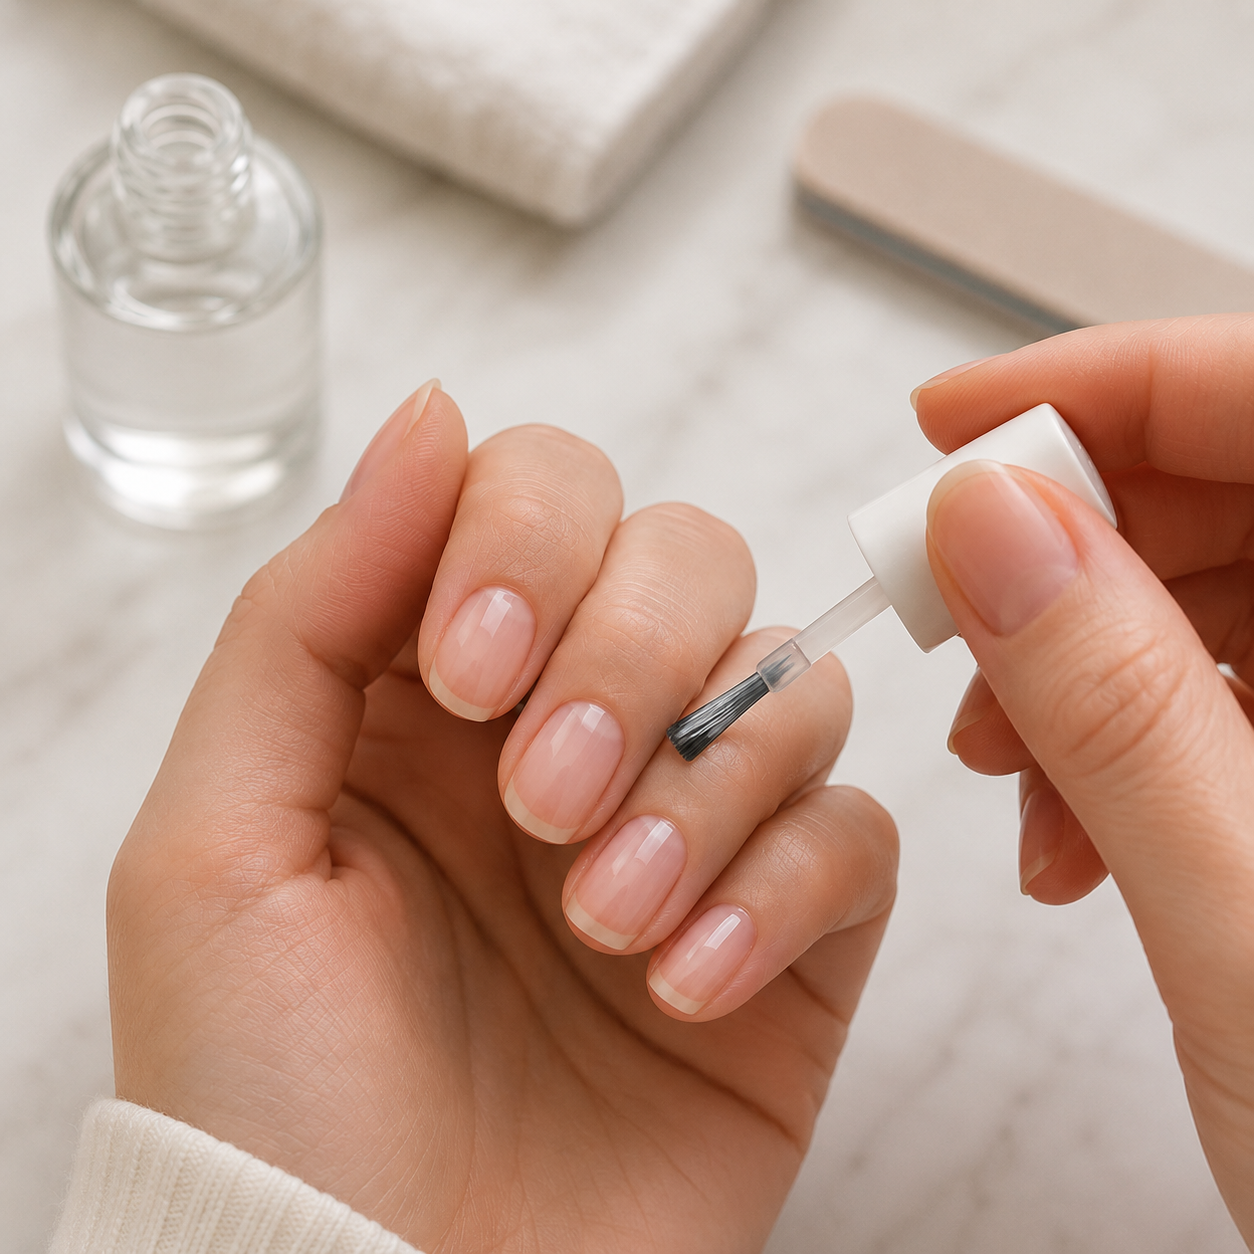
Step 2: Base Coat
Apply a thin, even base coat and let it dry completely. It protects your natural nail from staining and gives the polish something to grip onto, preventing early chipping.
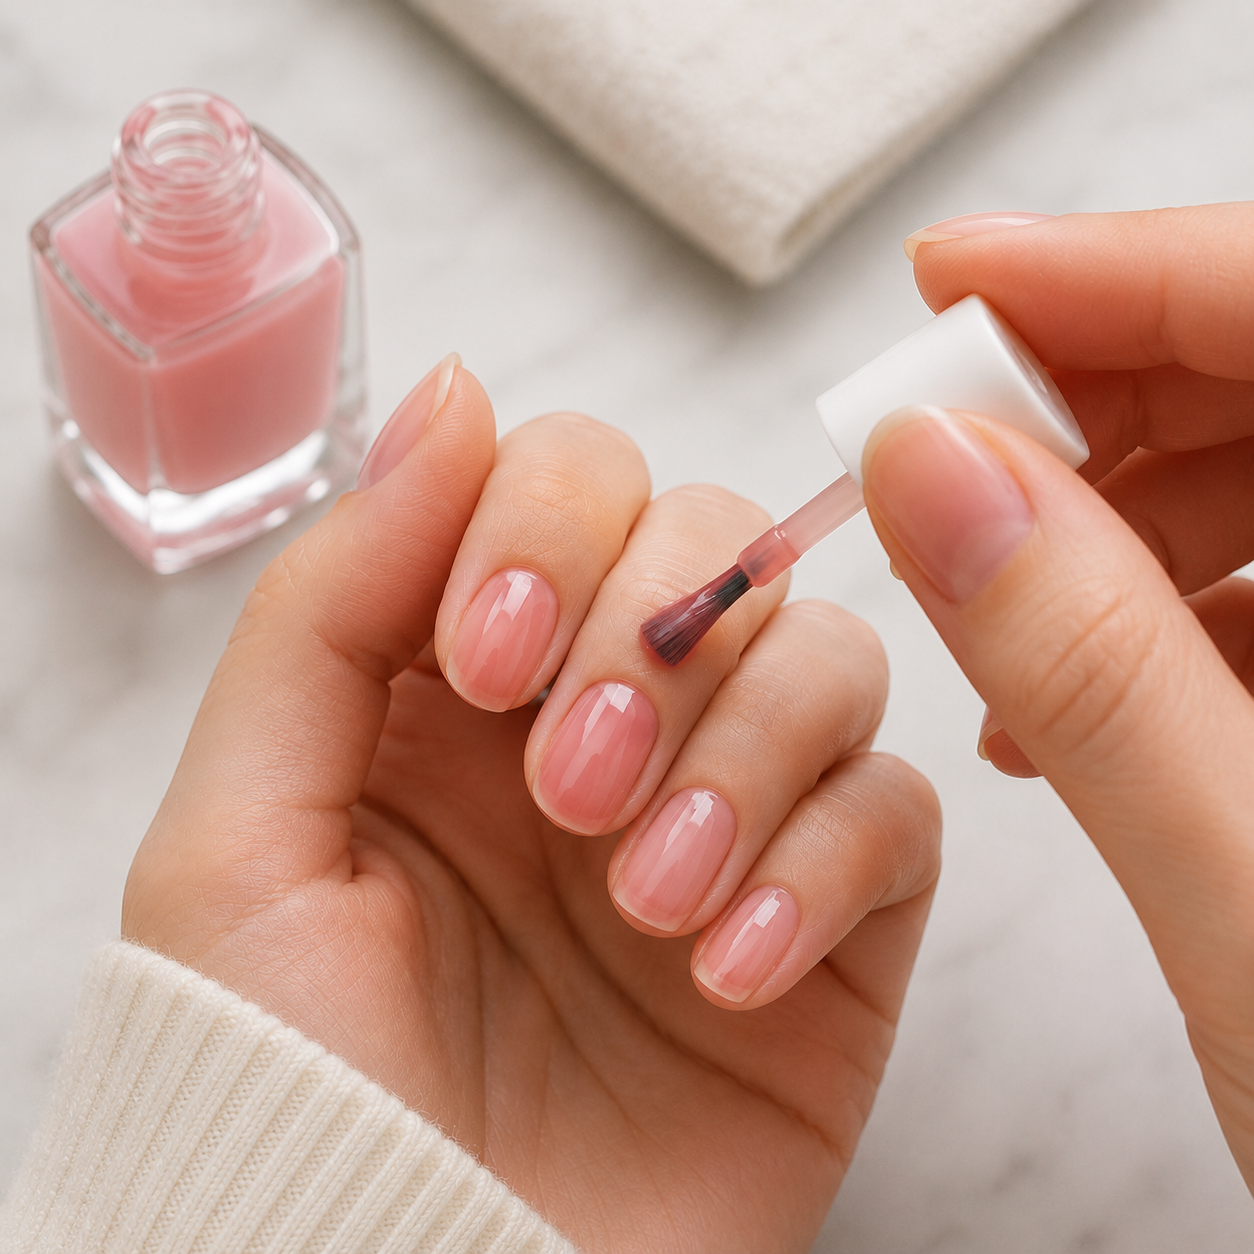
Step 3: Apply Your Jelly Polish — Thin and Intentional
Here’s the technique that makes or breaks the look: thin coats, multiple layers, patience between each one.
- Start with your first coat; it will look almost too sheer. Let it dry.
- Apply the second coat; you can start to see the depth building. Let it dry.
- Apply the third coat; you should now see the jelly effect properly. The color has dimension, but you can still see traces of your natural nail.
Step 4: The Optional-But-Worth-It Depth Trick
If you want to take the dimensional quality up a notch, try this on your third coat: apply the polish slightly thicker in the center of the nail and feather it out toward the edges. Leave the very edges slightly lighter. When the top coat goes on, this creates a subtle, rounded effect that makes the nails look almost sculptural.
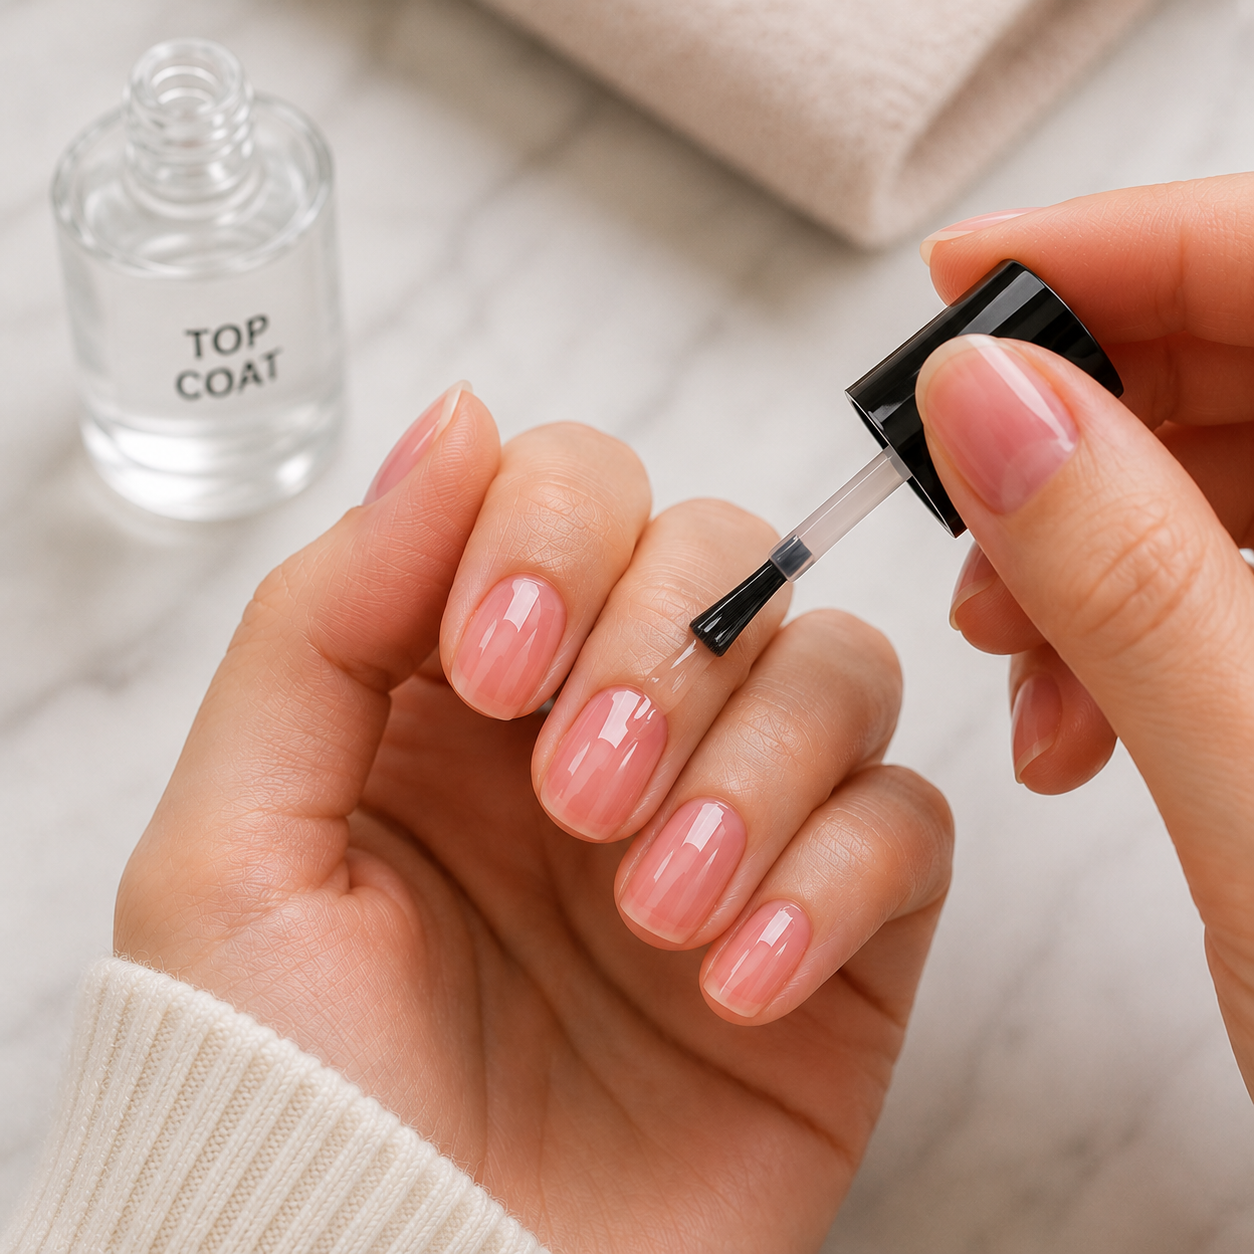
Step 5: Top Coat — Be Generous
This is your most important step. Apply your high-gloss top coat and don’t rush it. Use a full, generous stroke from base to tip. Cap the free edge, run the brush along the very tip of the nail, to seal everything in. Wait ten minutes, then apply a second top coat. The second layer is what gives you that truly wet, glassy finish.
Step 6: Cuticle Oil
Once everything is dry, apply cuticle oil around each nail and massage it in gently. This is your finishing move, making the whole thing look intentional and complete.
How to Make Your Glossy Jelly Nails Last Longer
- Reapply top coat every two to three days. This preserves the gloss and prevents chipping.
- Always cap the free edge during your top coat refreshes.
- Avoid hot water for at least an hour after application.
- Wear gloves for cleaning to prevent household cleaners from dulling the finish.
Why the Jelly Nail Trend Actually Makes Sense Right Now
The jelly manicure is part of a broader shift toward warmer, more dimensional beauty. Colors like translucent cherry, sorbet peach, and milky pink feel “edible” and soft. It strikes a rare balance: it’s specific enough to feel considered, but versatile enough for both a job interview and a weekend party.
Frequently Asked Questions
Can I get the jelly manicure look with regular nail polish I already own?
Absolutely! You don’t need a specially labeled “jelly polish”, any sheer or translucent formula will work. Hold the bottle up to the light: if you can see through it, you’re good to go for that signature glossy, translucent nail effect.
How many coats does a jelly manicure need?
Two to three thin coats is the sweet spot for most sheer jelly polishes. The goal is to build just enough depth to see the dimensional color while keeping that beautiful translucency, so resist the urge to go opaque with extra layers.
Do I need a gel lamp for a jelly nail look at home?
Nope, no UV or LED lamp required. A high-quality, gel-effect top coat applied generously (twice!) gives you that same wet, glassy, salon-finish result with regular air-dry polish. It’s one of the best things about this trend.
Which jelly nail shades are the most flattering for all skin tones?
Milky pink and sorbet peach are the most universally flattering options, as their soft warmth complements a wide range of complexions beautifully. Sheer coral is also a brilliant all-rounder, especially during summer when skin has a little warmth to it.
How long does a jelly manicure typically last?
With proper prep and a good gel-effect top coat, expect around five to seven days of chip-free wear. Refreshing your top coat every two to three days and capping the free edge each time can easily stretch that to ten days or more.
Ready to give the jelly manicure a go? Grab your sheeerest polish, your glossiest top coat, and twenty minutes, that’s genuinely all it takes. Drop your shade choice in the comments below; I’d love to know which one you’re reaching for first!
Hi, I’m Amber, the creator behind Dazzle Me Nails. I started this site because I’ve always believed nails aren’t just about beauty, they’re about confidence, self expression, and feeling put together in the simplest way. Like many of you, I’ve struggled with weak nails, chipped polish, and designs that looked good online but didn’t work in real life. That’s why I created Dazzle Me Nails to share nail ideas that are practical, wearable, and easy to recreate.
Here, you’ll find minimalist nail designs, trend inspired looks, and simple nail care tips to help you achieve clean, polished nails without over complicating your routine. If you love soft, classy, and effortless nail styles, you’re in the right place.