
My first peach manicure looked orange. Not a subtle warm-leaning peach, straight up Cheetos orange. I had grabbed a random peachy shade without testing it against my wrist, and under bathroom lighting it seemed fine. The moment I stepped outside? Disaster. That was four years ago. Since then I’ve tested probably 40 different peach polishes across friends with skin tones ranging from porcelain to deep espresso, and I’ve finally figured out which undertones actually work universally versus which ones only photograph well on certain complexions. If you’re searching for peach nail designs that actually flatter your skin tone instead of turning overly orange or washed out, these are the shades and styles worth saving.
What Makes These Four Peach Looks Different
Peach sits in tricky territory between pink and orange. Lean too pink and it reads as salmon. Too orange and you’re in coral territory, pretty, but not peach. The four peach nail designs I’m sharing here all stay firmly in that sweet spot, but each one solves a different problem. One’s for maximum shine. One’s for people who hate shine. One’s specifically for short nails. And one’s a statement look for when you need your hands to do some work at a wedding or event.
I picked these after eliminating probably a dozen other options that only looked good on one or two skin tones.
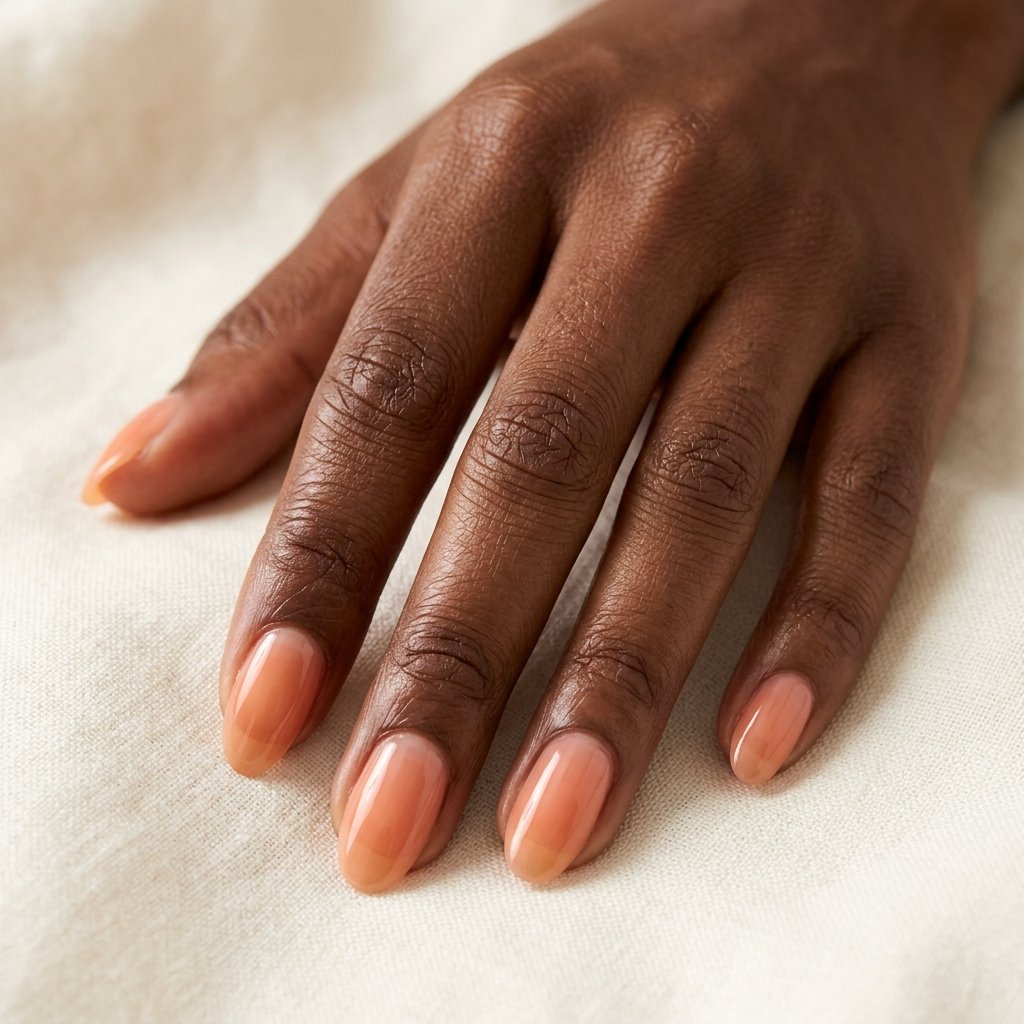
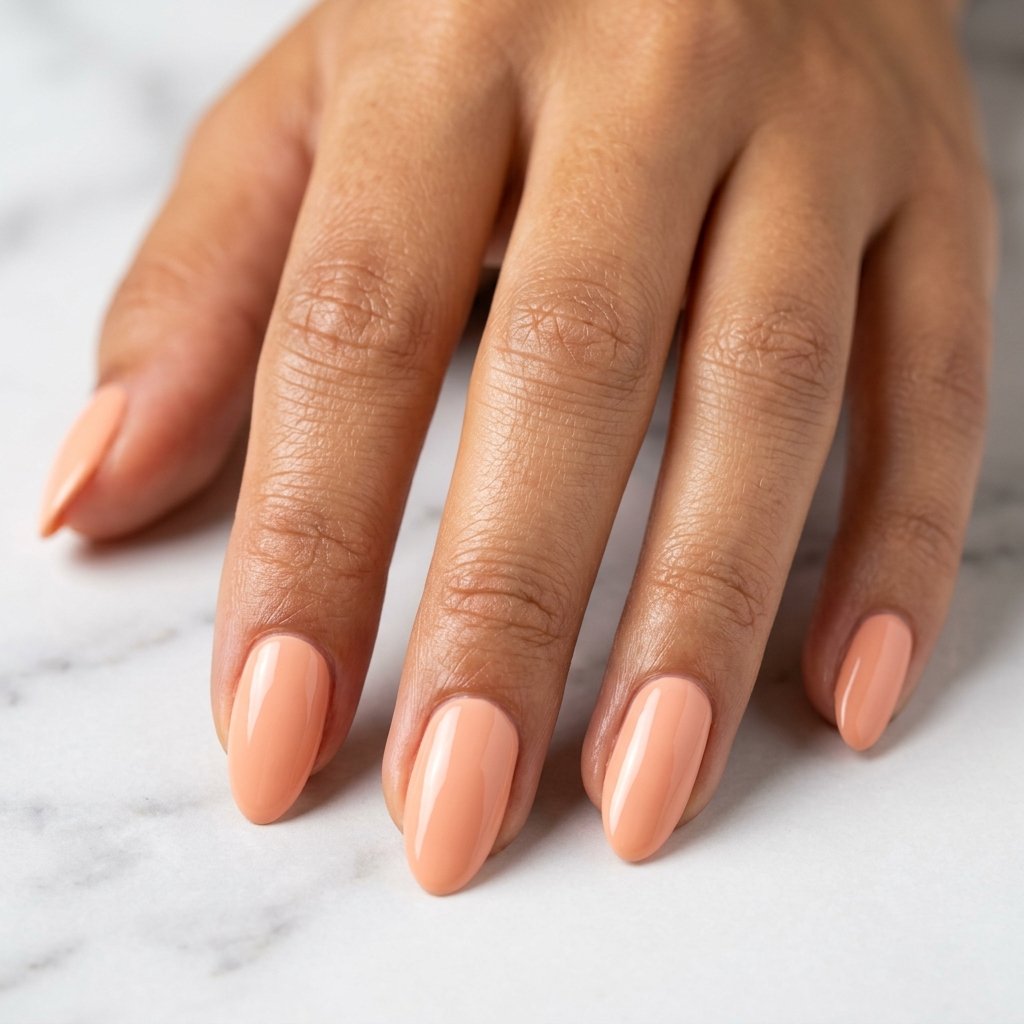
The Jelly Peach That Glows From Within
This one surprised me. I expected jelly finishes to look cheap, you know, that sheer drugstore vibe from middle school. But the right jelly peach creates this lit-from-within effect that solid cream polishes cannot match.
The trick is building up three thin coats instead of two thick ones. Two coats leaves it too transparent and your nail bed shows through unevenly. Four coats loses the depth. Three hits that perfect spot where light passes through the color and bounces back. Takes about 18 minutes total with proper dry time between layers.
This finish tends to photograph incredibly well in natural light. I’ve noticed it looks slightly different depending on whether you’re in direct sun versus shade, warmer in sun, more pink in shade. Both are flattering. On deeper skin tones, this jelly effect really pops because the contrast makes that glow even more visible.
What I Actually Use
Essie Nail Polish in Peach Side Babe
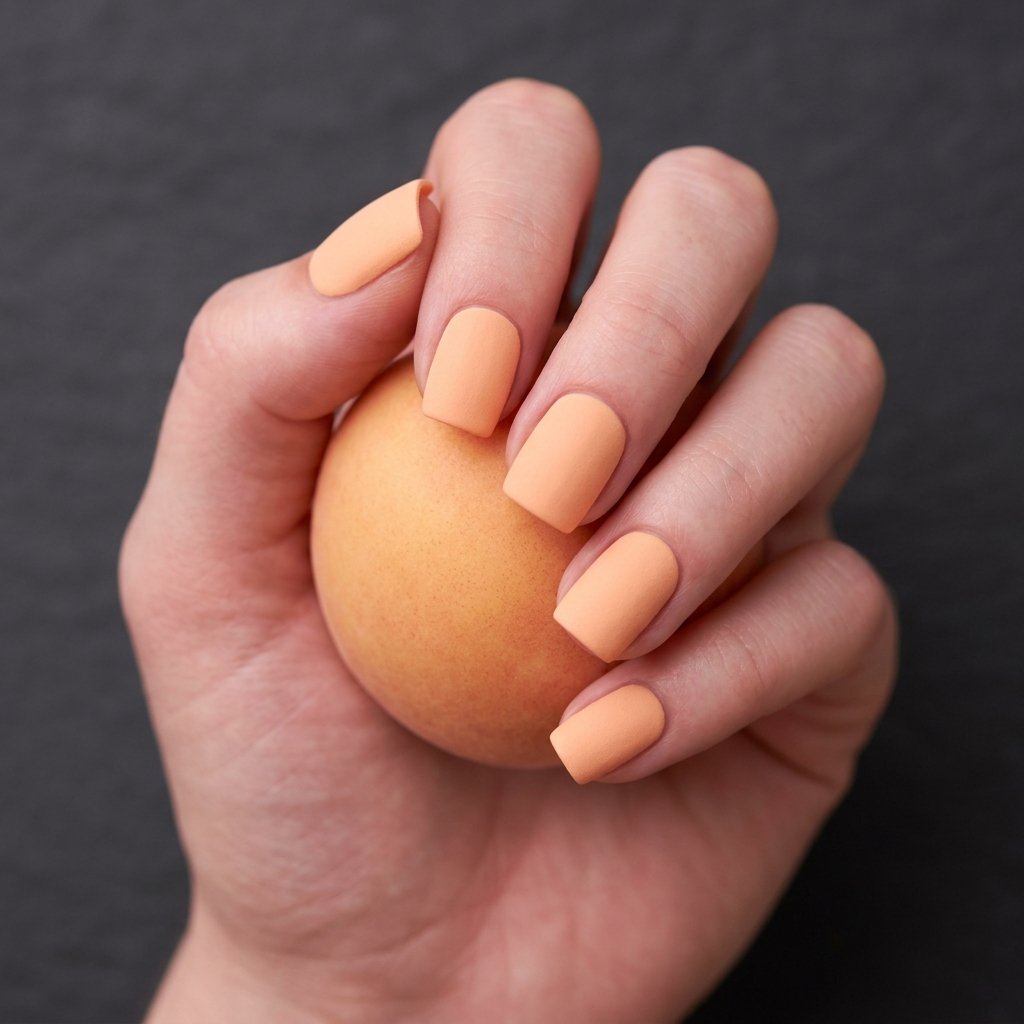
Matte Velvet Peach for People Who Hate Shine
Not everyone wants glossy nails. I resisted this for years because I associated matte with that 2016 matte black trend that aged terribly. But matte peach? Completely different energy. It reads sophisticated in a way glossy peach sometimes doesn’t.
Here’s what most tutorials skip: you need to apply matte topcoat while the color is still slightly tacky. Fully dried polish plus matte topcoat equals a cloudy, uneven finish. Slightly tacky plus matte topcoat equals that perfect velvet texture.
The matte finish also hides minor application mistakes better than glossy. Any tiny streaks or thin spots become invisible. For that reason I actually recommend this version if you’re newer to doing your own nails.
One honest caveat, matte shows oils from your skin faster. By day three you might notice shiny patches where you’ve been touching things. A quick swipe with the matte topcoat fixes it in 30 seconds.
Worth Every Penny
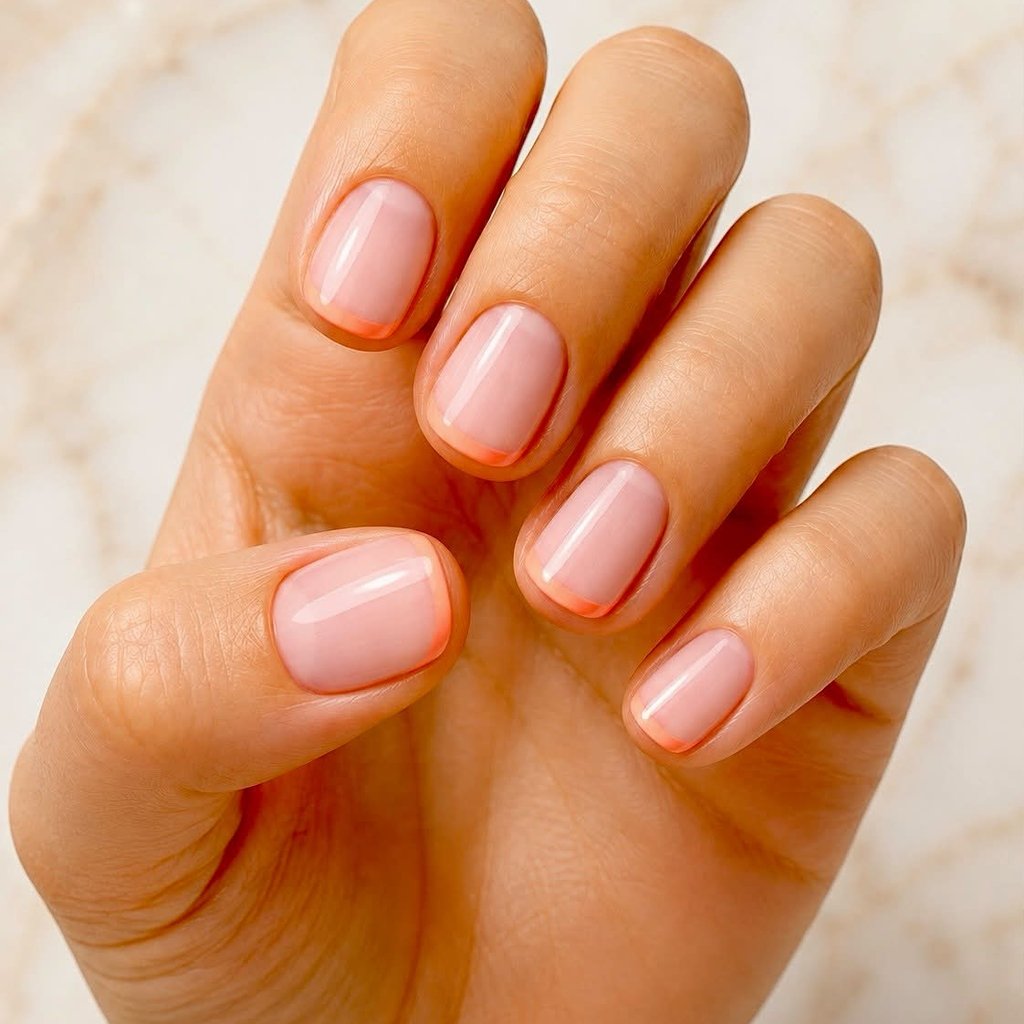
The Micro-French Peach Tip for Short Nails
French tips on short nails usually look wrong. The white line sits too close to your cuticle and the proportions feel cramped. But a micro-French, we’re talking a 2 mm line maximum, in peach instead of white changes everything.
The peach tip on a sheer pink or nude base creates this barely-there definition that elongates short nail beds. I tested this on my friend Sarah whose nails never grow past her fingertips. She said strangers asked if she’d gotten extensions. She hadn’t. Just that visual trick of the warm peach drawing the eye to the tip.
You need a thin striping brush for this. The brushes that come in the bottle are too thick. A 00 detail brush gives you the control to make that line crisp and even. One mistake I made early on: pulling the brush across instead of rolling it. Rolling keeps the line width consistent. Pulling creates wobbles.
This look works on every nail length, but it genuinely shines on shorter nails because it solves a real problem.
The Exact Product
Sally Hansen Insta-Dri in Peach Please
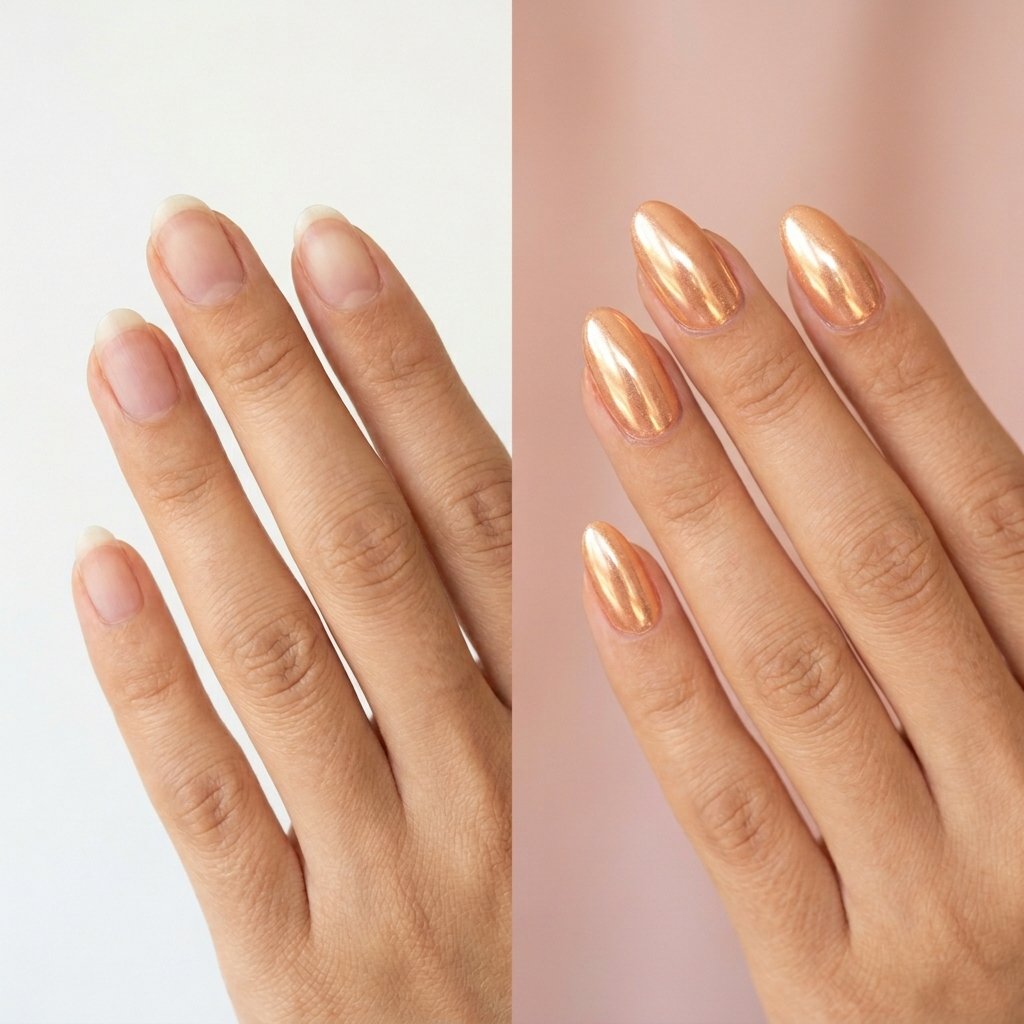
Peach Chrome With Gold Shimmer for Special Occasions
Okay. This is the show-stopper. Chrome peach with gold micro-shimmer is the look I wear when I need my hands to be noticed, engagement photos, weddings, important meetings where I know I’ll be gesturing.
Most chrome tutorials focus on silver or rose gold, but gold-toned chrome over a peach base creates this almost-metallic-but-still-warm effect that reads expensive. The shimmer catches light without looking glittery or juvenile.
The technique matters here. Chrome powder only adheres properly to a gel base that’s been cured and wiped with alcohol. I learned this after wasting an entire jar of expensive chrome powder on regular polish. The powder just sat there looking patchy and sad. Gel, cure, wipe, chrome, cure again, that sequence is non-negotiable.
For the gold shimmer, I mix a tiny bit of gold chrome powder (maybe 15%) into the peach chrome powder before applying. Pre-mixed. Trying to layer them separately creates a muddy finish.
This look lasts about two weeks with zero chipping if you cap the edges properly during application.
Amber’s Pick
Technique Tips That Apply to Every Peach Look
Base coat matters more with peaches than darker colors. Peach polishes tend to be more sheer, so any yellowing or staining on your natural nail shows through. I always use a ridge-filling base coat specifically because it creates an even canvas.
Temperature affects peach polish more than I expected. Last winter I left a bottle in my car overnight and the formula separated permanently. Room temperature storage only.
And this might sound obvious but, push your cuticles back before applying any peach. The light color emphasizes cuticle buildup in a way that dark colors hide. A quick 30-second cuticle push makes the whole manicure look cleaner.
Frequently Asked Questions
What undertone of peach works on cool skin tones?
Peaches with a slight pink lean tend to work better on cool undertones. Pure orange-peaches can clash. Look for shade names that include “blush” or “rose”, they usually have that pink shift built in.
How long do peach nail designs typically last?
With proper base coat and topcoat, most of my peach manicures last 5 to 7 days before visible tip wear. The chrome version lasts longer, around two weeks, because gel cures harder than regular polish.
Can peach nails look professional for office settings?
Absolutely. Muted peachy nudes are actually some of the most office-appropriate colors I own. The jelly and micro-French versions read as polished rather than trendy. I’d avoid the chrome for conservative workplaces though.
What’s Your Favorite Peach Look?
Peach nail designs sit in that perfect space between statement and neutral, interesting enough to notice, wearable enough for every day. The jelly finish remains my personal favorite because that glow just does something special. But I’d genuinely love to know which one you’re trying first. Are you a matte convert? Going bold with the chrome? Or keeping it subtle with the micro-French? Drop a comment and tell me your pick.
Hi, I’m Amber, the creator behind Dazzle Me Nails. I started this site because I’ve always believed nails aren’t just about beauty, they’re about confidence, self expression, and feeling put together in the simplest way. Like many of you, I’ve struggled with weak nails, chipped polish, and designs that looked good online but didn’t work in real life. That’s why I created Dazzle Me Nails to share nail ideas that are practical, wearable, and easy to recreate.
Here, you’ll find minimalist nail designs, trend inspired looks, and simple nail care tips to help you achieve clean, polished nails without over complicating your routine. If you love soft, classy, and effortless nail styles, you’re in the right place.