
I ruined three manicures before I figured out burnt orange nails. The first one pulled too red against my warm undertones. Second attempt went full pumpkin, not the vibe. Third time I mixed the wrong top coat and dulled the whole thing into sad terracotta. That was two autumns ago. Since then I’ve tested probably forty burnt orange polishes and narrowed down exactly what makes this color sing versus scream. These four looks are the ones that actually worked, and I’m breaking down why each one hits differently depending on your skin tone, nail length, and finish preferences.
What Makes Burnt Orange Work
Burnt orange sits in this narrow sweet spot between rust and tangerine. Too much red and it reads as brick. Too much yellow and you’ve got squash hands. The versions that photograph well and wear well tend to have a brown base that anchors the orange without muddying it.
I chose these four looks because each solves a different problem. One works on every skin tone I’ve tested. One fixes the “my nails look stubby” issue. One gives you that expensive fall aesthetic without five coats. And one is the before/after transformation that made my friend text me “wait what did you do.”
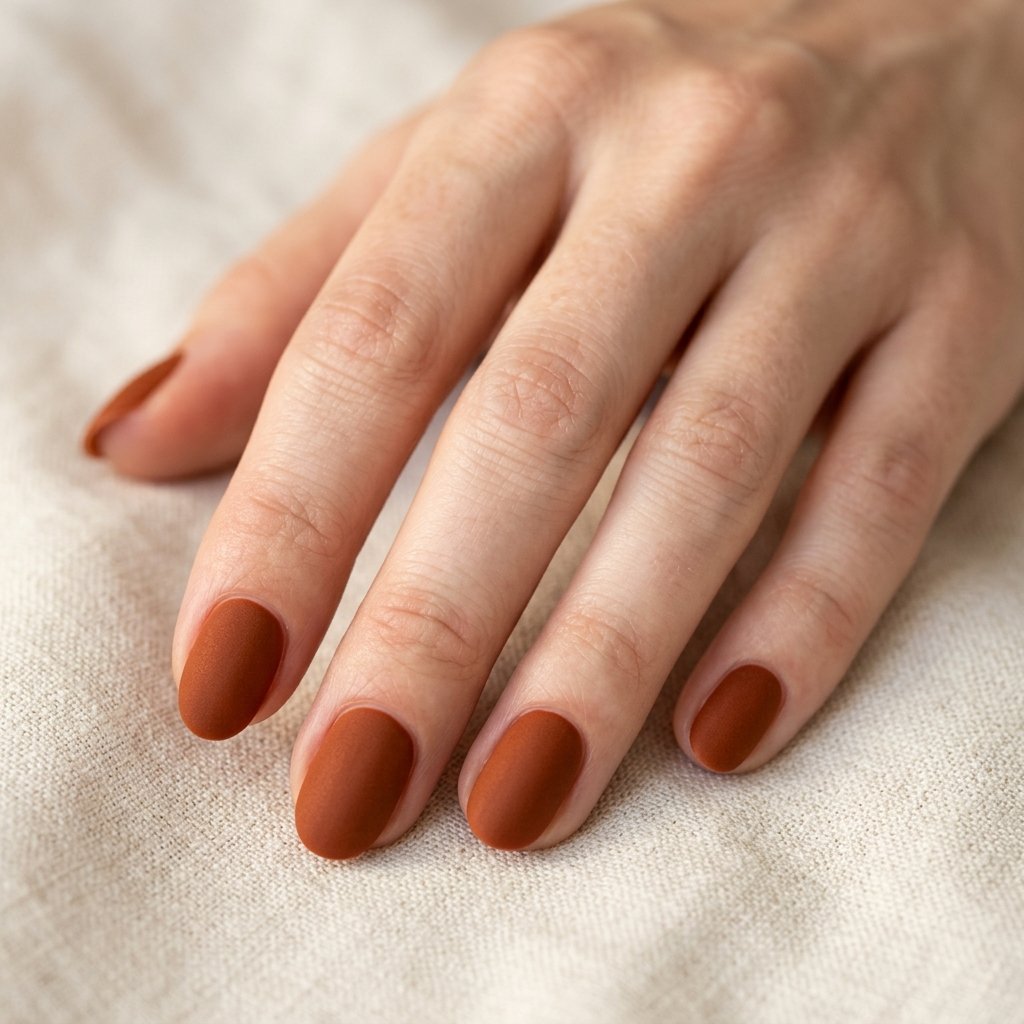
The Matte Cinnamon That Works on Every Skin Tone I’ve Tested
Here’s something most articles won’t tell you. Regular glossy burnt orange can wash out lighter cool-toned skin while overwhelming deeper skin tones. Matte changes the equation completely.
The finish absorbs light instead of bouncing it, which means the color reads more neutral. I’ve done this exact shade on four friends ranging from fair pink undertones to deep warm brown, and every single one looked good. Not “it’s fine.” Actually good. The trick is two thin coats, three gets chalky. And you need to let each coat dry fully. I’m talking seven to eight minutes minimum, not the two minutes most people do.
Shape matters here too. Matte finishes tend to emphasize nail shape more than glossy, so file carefully. Oval or soft almond works best.
The Product I Chose
Essie Expressie Quick-Dry Nail Polish in Bolt and Be Bold
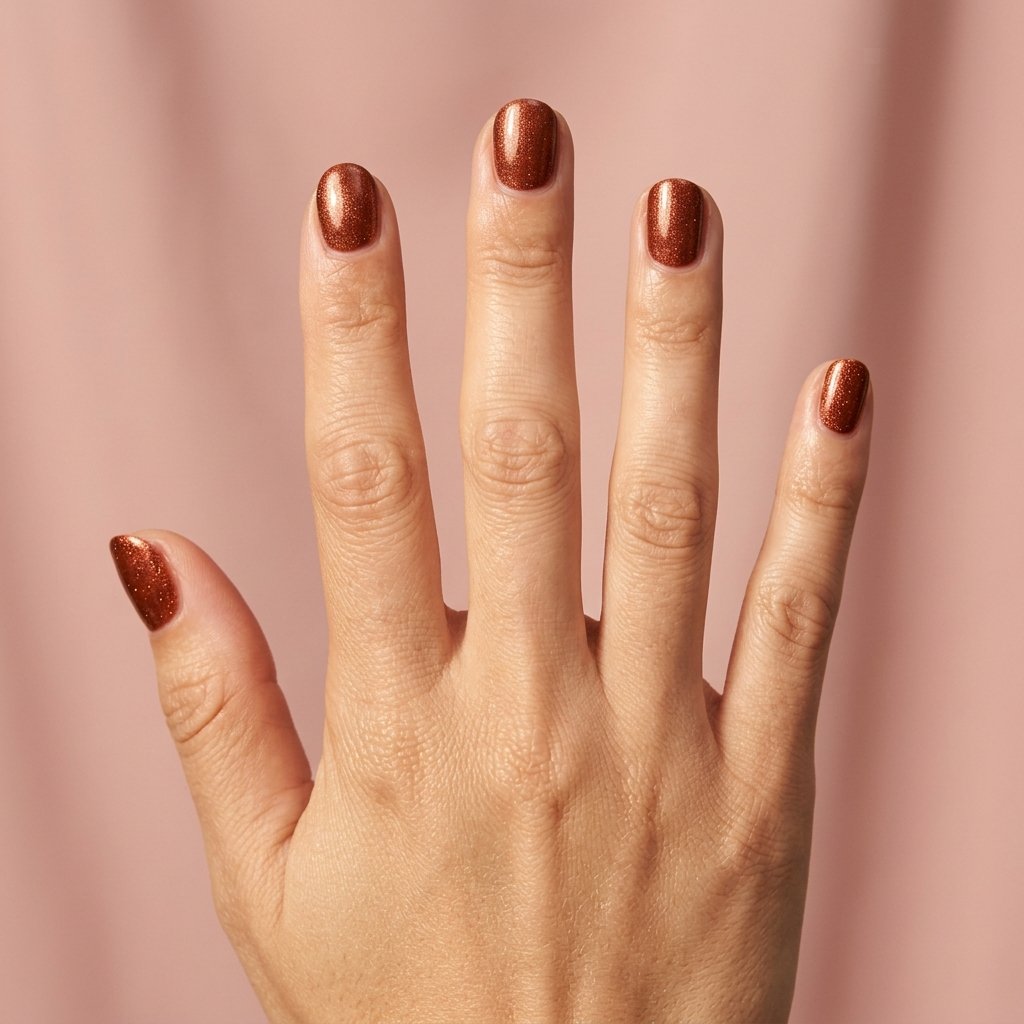
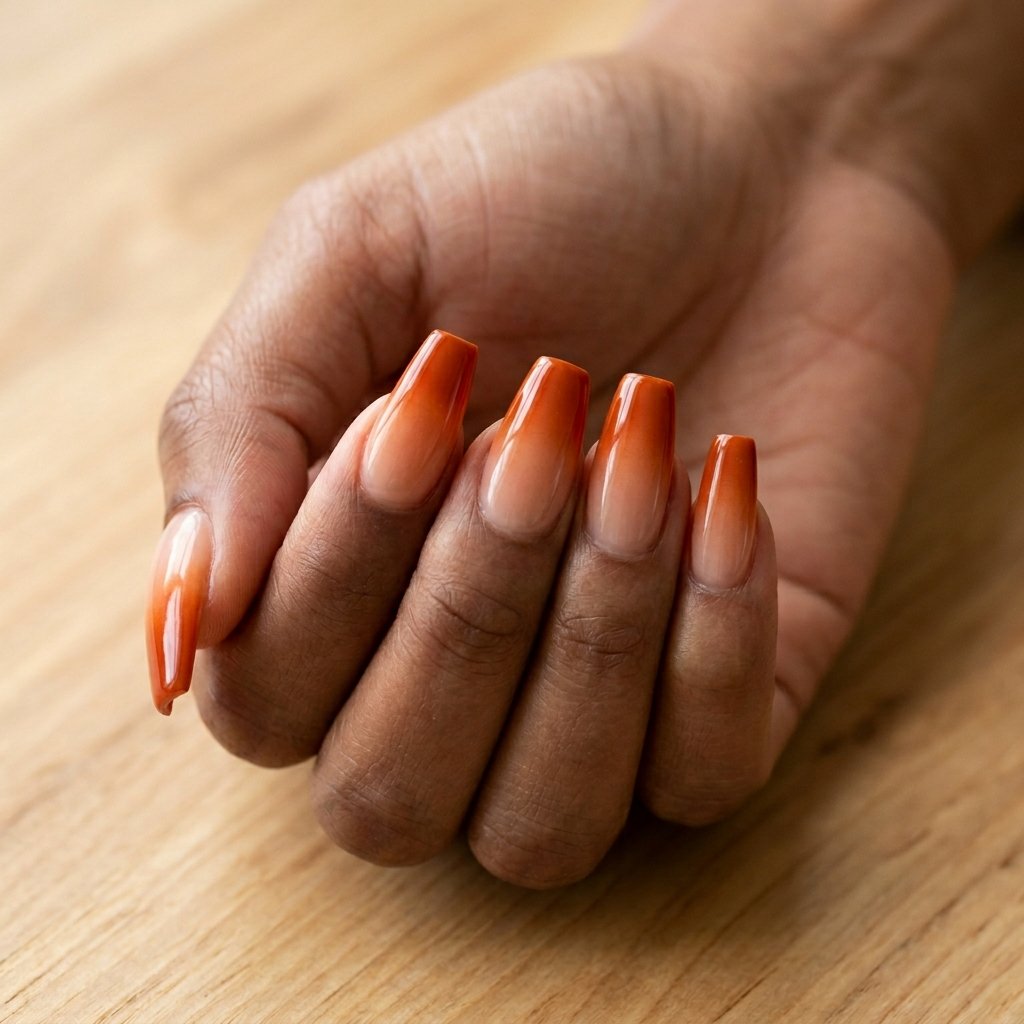
The Copper Shimmer That Elongates Short Nails
I have naturally short nail beds. Always have. And burnt orange can make them look even stubbier if you pick the wrong finish. Discovered this the expensive way at a salon that charged me forty-two dollars for a manicure that made my hands look like dinner rolls.
The fix is copper shimmer. The metallic particles create vertical light movement that draws the eye lengthwise. But, and this is important, it needs to be fine shimmer, not chunky glitter. Chunky glitter does the opposite and shortens.
Apply in vertical strokes from cuticle to tip. One coat base, two coats color, top coat. The shimmer settles differently depending on your stroke direction, so keep them all going the same way. This look tends to last about six days before tip wear shows, which is better than most orange polishes in my experience.
Why It’s Worth It
OPI Nail Lacquer in Chocolate Moose
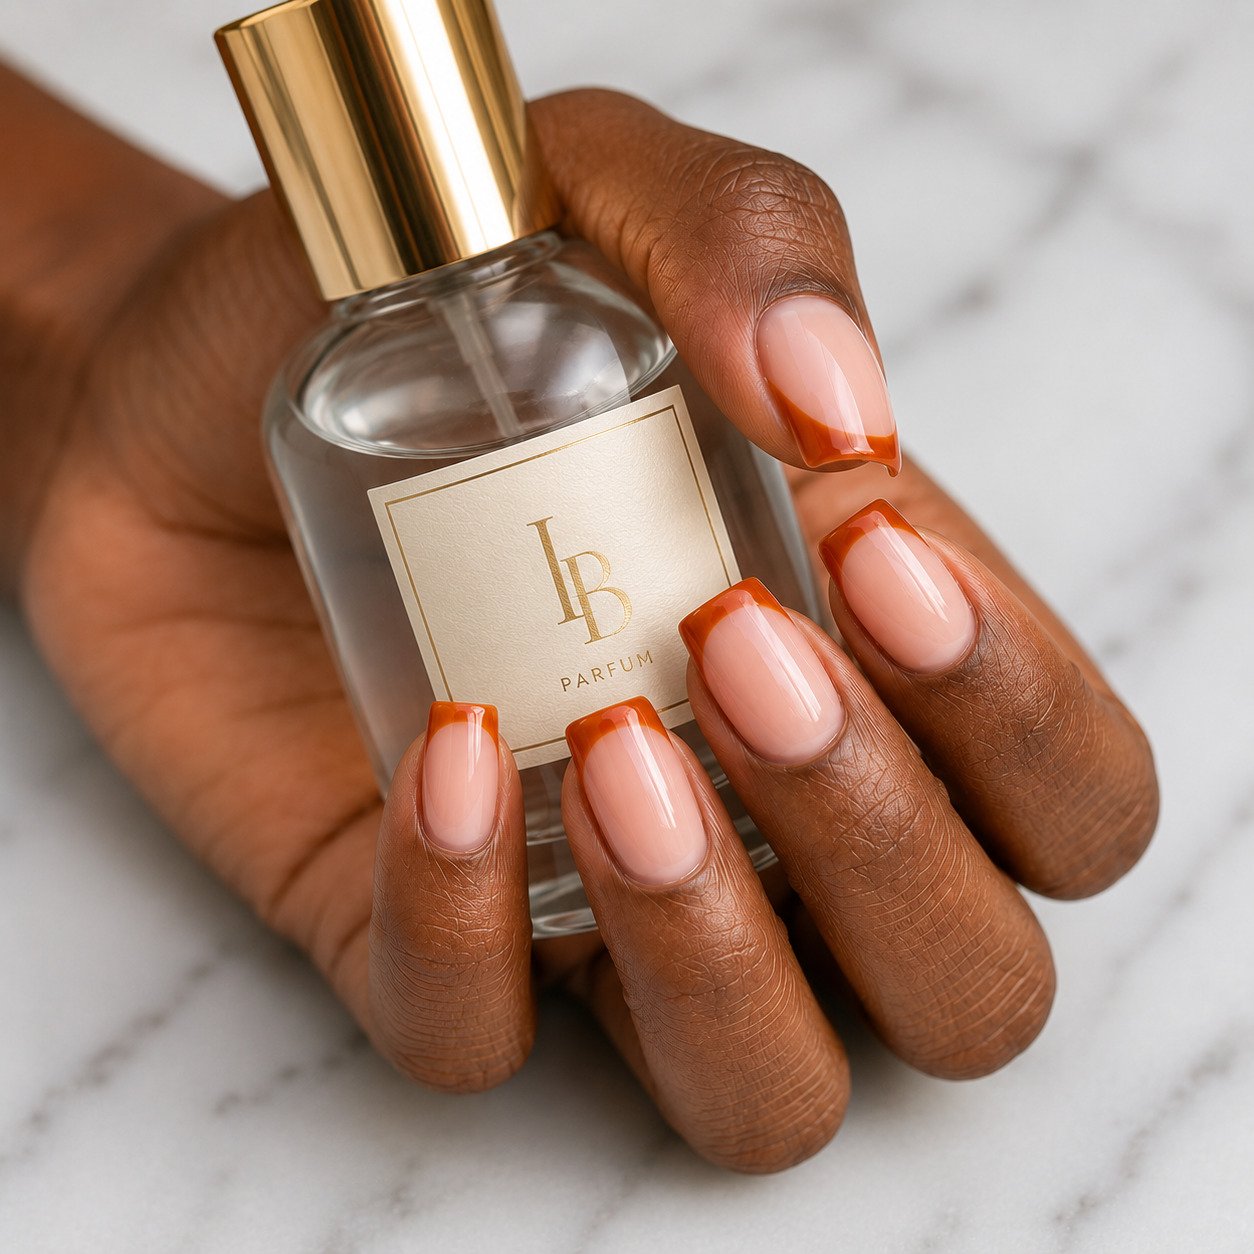
The French Tip Twist That Looks Expensive in One Coat
Burnt orange French tips. Sounds obvious but almost nobody does them right.
Most people use tape and end up with thick uneven lines. Others freehand and get wobbly smile lines. The version that actually looks salon-quality uses a thin striping brush and one confident stroke per nail. I know, easier said than done. But here’s the thing. It takes less time to learn proper brush control than to redo a taped tip three times.
The base stays nude or sheer pink. Nothing opaque. The burnt orange tip gets applied in one stroke, starting from one edge of the nail and curving to the other. If you mess up, wipe immediately with a brush dipped in acetone and try again. This look tends to get more compliments than any solid color I’ve done, probably because it reads as intentional and polished without being loud. Works on medium to long lengths. Short nails need a thinner tip line to avoid looking cramped.
Amber Recommends
Sally Hansen Insta-Dri Nail Color in Burnt Cinnamon
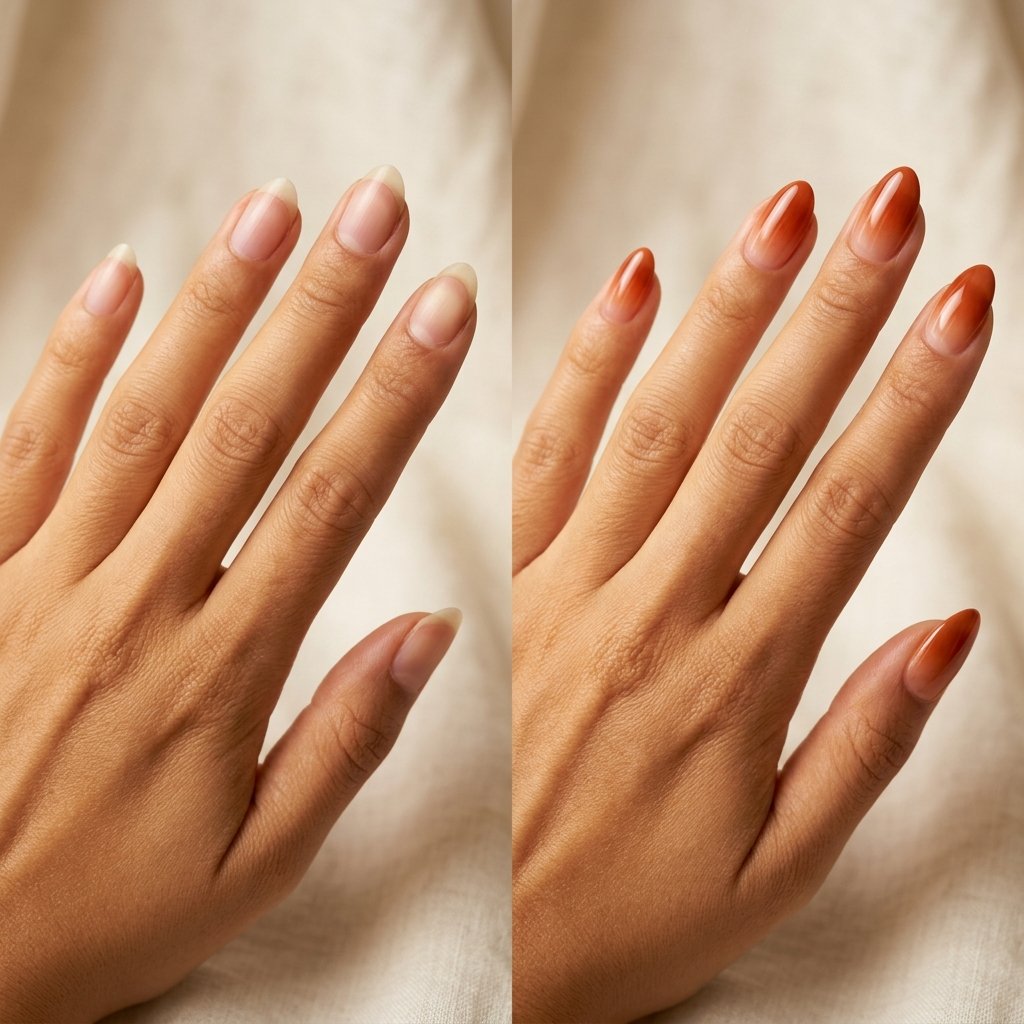
The Gel Gradient That Made My Friend Text Me
My friend Sarah saw my nails at brunch last October and immediately grabbed my hand. “Wait what did you do.” Not a question. A demand.
This is a burnt orange to nude gradient, sometimes called an ombre, done with gel polish. The color starts opaque at the tip and fades to nearly invisible at the cuticle. Creates this glowing ember effect that looks like you paid someone very skilled a lot of money.
The technique requires a small sponge. You paint a stripe of burnt orange gel near the tip, then dab with the sponge toward the cuticle while the gel is still wet. Cure. Repeat twice. The key is light pressure and quick dabs, pressing too hard leaves sponge texture visible. For most people this takes about four practice nails before it looks right. I needed six.
This gradient tends to work better on longer nails because you have more surface area for the fade. On very short nails the color transition looks compressed.
My Go-To Choice
Beetles Gel Nail Polish Set Burnt Orange Collection
Application Tips That Apply to All Four Looks
Push your cuticles back the day before, not the day of. Fresh cuticle work creates micro-damage that polish can seep into, causing lifting within days. I learned this after my third gel set peeled at the edges within a week.
Dehydrate the nail plate. Most people skip this. A quick swipe of pure acetone before base coat removes natural oils and gives polish something to grip. My manicures started lasting almost twice as long once I added this step.

Cap the free edge. Every single coat, base, color, top, should be swiped across the very tip of the nail. This seals the edge and prevents water from getting underneath. Most tip chips start because someone skipped this.
Frequently Asked Questions
Does burnt orange nails polish work for summer or just fall?
It tends to photograph a bit out of season in July, but muted versions with brown undertones work year-round. I’ve worn mine to beach vacations and gotten compliments. The brighter pumpkin oranges read more specifically autumn.
How do I keep burnt orange polish from staining my nails?
Always use base coat, and not just any base coat. A ridge-filling or nail-strengthening formula creates a thicker barrier. I’ve found OPI Natural Nail Base Coat prevents staining better than thinner options. Still see slight discoloration after two weeks of wear.
What colors go with burnt orange for nail art?
Cream, gold, and chocolate brown pair well. Black accents work for edgier looks. I generally avoid pairing with red or bright pink because the clash tends to look unintentional rather than artistic. Sage green creates unexpected contrast that actually works.
Your Turn
Burnt orange nails take a bit more thought than red or nude, but the payoff is worth it. The matte cinnamon for universal flattery, the copper shimmer for short nail beds, the French tip for understated elegance, the gradient for conversation-starting drama. One of these will work for you.
Which look are you trying first, and what’s your skin tone? I’m always curious whether my recommendations hold up across more people.

Hi, I’m Amber, the creator behind Dazzle Me Nails. I started this site because I’ve always believed nails aren’t just about beauty, they’re about confidence, self expression, and feeling put together in the simplest way. Like many of you, I’ve struggled with weak nails, chipped polish, and designs that looked good online but didn’t work in real life. That’s why I created Dazzle Me Nails to share nail ideas that are practical, wearable, and easy to recreate.
Here, you’ll find minimalist nail designs, trend inspired looks, and simple nail care tips to help you achieve clean, polished nails without over complicating your routine. If you love soft, classy, and effortless nail styles, you’re in the right place.