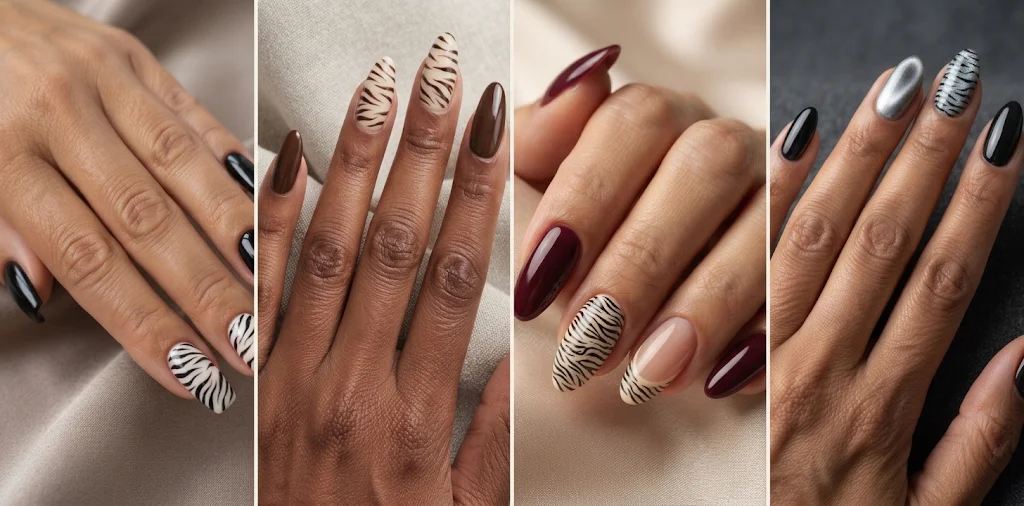
Zebra nails work in more than black and white. Chocolate stripes feel softer, burgundy adds richness, and silver magnetic polish brings a reflective finish to the pattern.
These ten designs range from subtle short accents to long statement tips, with practical advice on choosing your shape, painting the stripes, and explaining your look at the salon.
Disclosure: This post contains affiliate links, including Amazon links. If you buy through one, I may earn a small commission at no extra cost to you. As an Amazon Associate I earn from qualifying purchases. Read the full Affiliate Disclosure
What Are Zebra Nails?
Zebra nails are manicures decorated with irregular, tapering stripes inspired by a zebra’s coat. Black stripes over a white base create the classic version, but the same pattern works in brown, burgundy, silver, pink, and other color combinations.
The stripes can cover the entire nail, sit inside a French tip, or appear on just one or two accent fingers. They can be painted by hand, transferred with a stamping plate, or applied using suitable nail decals.
Unlike evenly spaced pinstripes, this pattern benefits from uneven widths, branching lines, and small changes in direction. You should still see enough base color between the markings for each stripe to remain distinct.
How to Choose Your Zebra Nail Design
Before choosing a reference photo, decide how much pattern you want to see every day. A dramatic manicure can look beautiful in a close-up but feel busier than expected when every finger carries detailed artwork.
Use this as a starting point:
| Your preference | Design direction | Shapes to consider |
|---|---|---|
| Subtle and easy to coordinate | Brown stripes on ivory accent nails | Short oval or medium almond |
| Graphic and polished | Black-and-white French tips | Medium square or almond |
| Rich and dressy | Burgundy solids with striped accents | Almond or tapered square |
| Reflective and detailed | Silver magnetic tips with black stripes | Medium or long almond |
| Bold and expressive | Full print with one coordinated accent | Long square or coffin |
These are design suggestions rather than rules. A nail artist can adapt the pattern to your natural length and preferred proportions.
1. Classic Black-and-White Zebra Nails
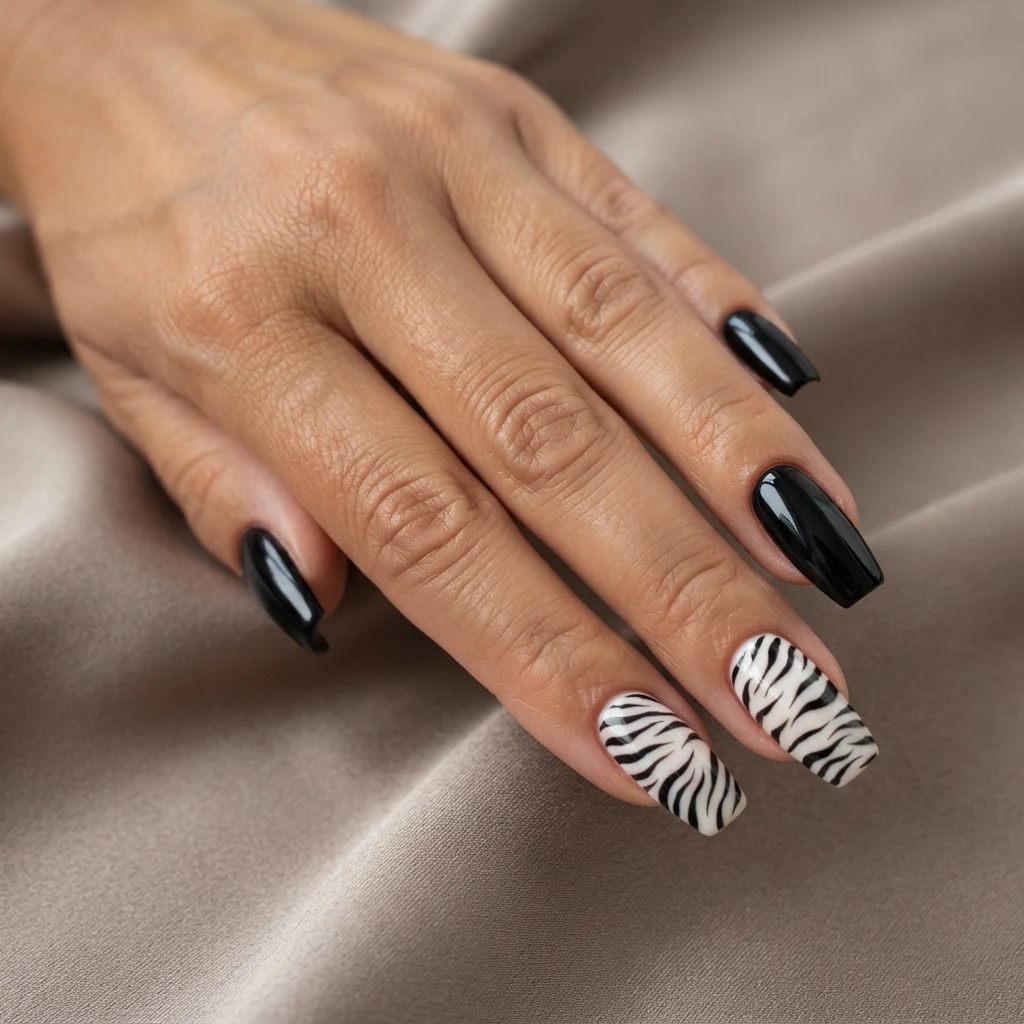
Start with a creamy white base and paint irregular black stripes across the surface. Keep the finish glossy so the contrast looks crisp, with a few wider markings balanced by thinner, tapered lines.
Medium almond nails give this version a curved outline, while square nails make the pattern feel more graphic. If you choose a longer square shape, resist filling every available space. Leaving visible white between the stripes keeps the artwork readable.
For a balanced set, use full print on three fingers and solid black on the remaining two. You still get a striking manicure, but the plain nails interrupt the pattern before it becomes visually crowded.
At the salon, ask for “irregular black zebra stripes over creamy white, with tapered ends and visible space between the markings.” That description is more useful than asking for black-and-white animal print alone.
For a home version, a fine nail-art liner brush set can help you vary the width and direction of the stripes. Choose a brush that feels controllable rather than assuming the longest bristles will be easiest to use.
2. Chocolate and Ivory Zebra Nails
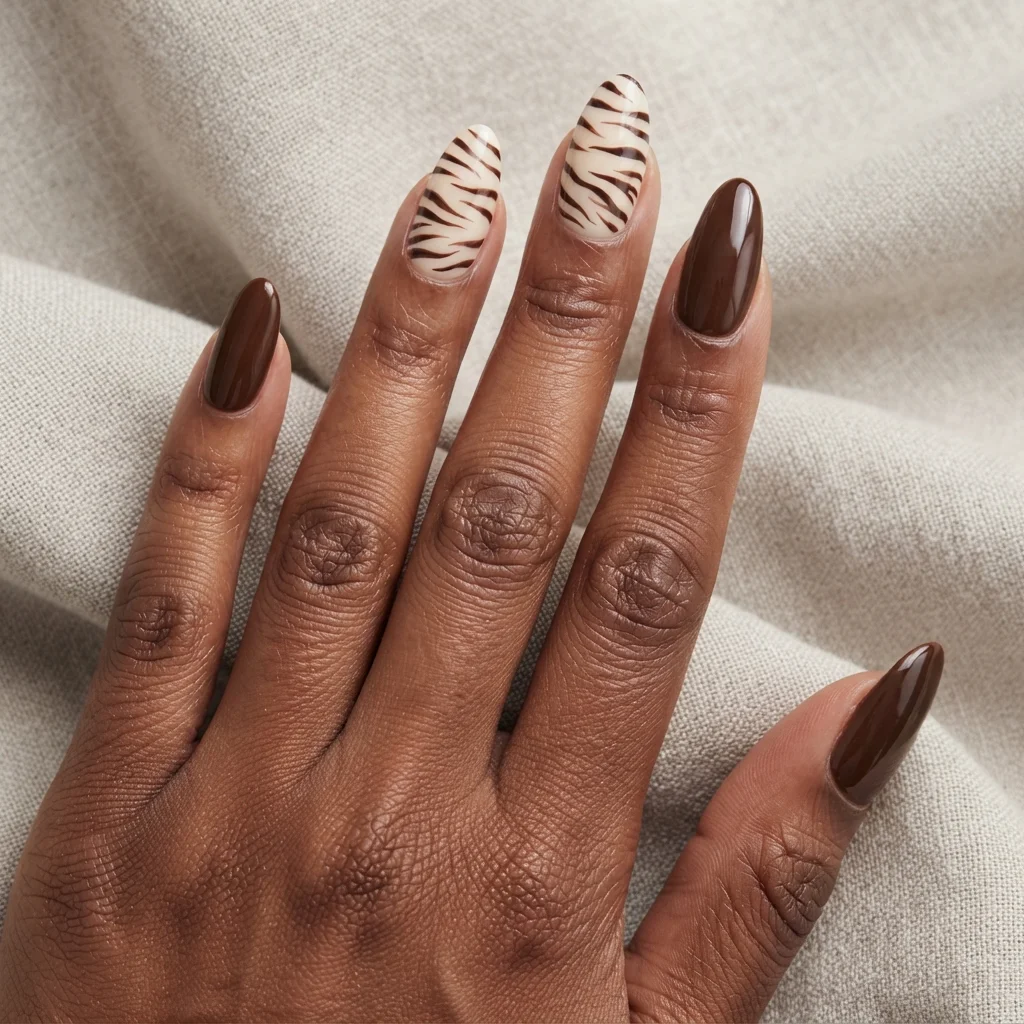
Brown-and-cream zebra nails offer a gentler alternative to stark monochrome. Use an ivory foundation with espresso or dark chocolate stripes, then repeat the brown on one or two solid nails.
The important distinction is between the two colors. If your base is too beige and the stripes are too light, the pattern may disappear at a normal viewing distance. A pale creamy base gives the deeper markings enough definition.
Medium almond nails suit this palette particularly well, especially when the print sits on the middle and ring fingers. Keep the thumb, index, and pinky glossy chocolate for a set that feels coordinated without repeating the same artwork everywhere.
This is an easy direction to pair with camel coats, cream sweaters, denim, or a simple black dress. It also works beyond fall because the design relies on neutral colors rather than seasonal motifs.
If you enjoy softer animal patterns, explore these Bambi nail ideas for a different interpretation built around warm brown shades and pale markings.
3. Zebra French Tip Nails With a Sheer Pink Base
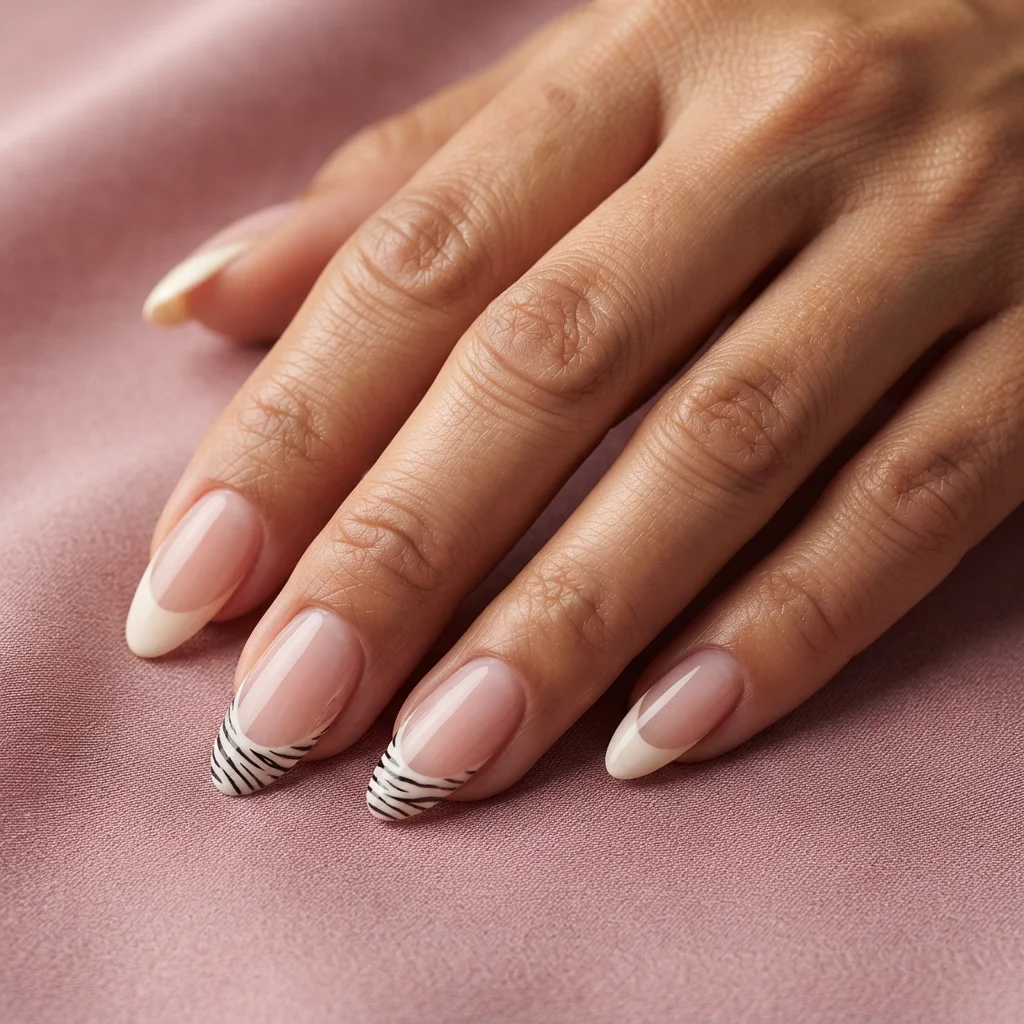
A sheer pink base makes the striped tips the main feature. Keep the area near the cuticle clean and translucent, then build a white French tip with fine black markings inside it.
The depth of the tip matters. A very narrow French edge leaves little room for recognizable stripes, especially on short nails. On medium almond or square nails, a slightly deeper tip gives the pattern space without covering the entire nail.
You can use the same French shape on every finger or alternate striped tips with plain white ones. The second option is useful if you want something that feels closer to a familiar French manicure.
Avoid adding a heavy outline around every tip unless that border is an intentional part of the design. The animal print already creates a strong edge.
Bring a reference showing the exact tip depth you like. “French tips” can mean anything from a barely visible line to a broad section covering much of the free edge.
4. Burgundy Zebra Nails With Statement Accents
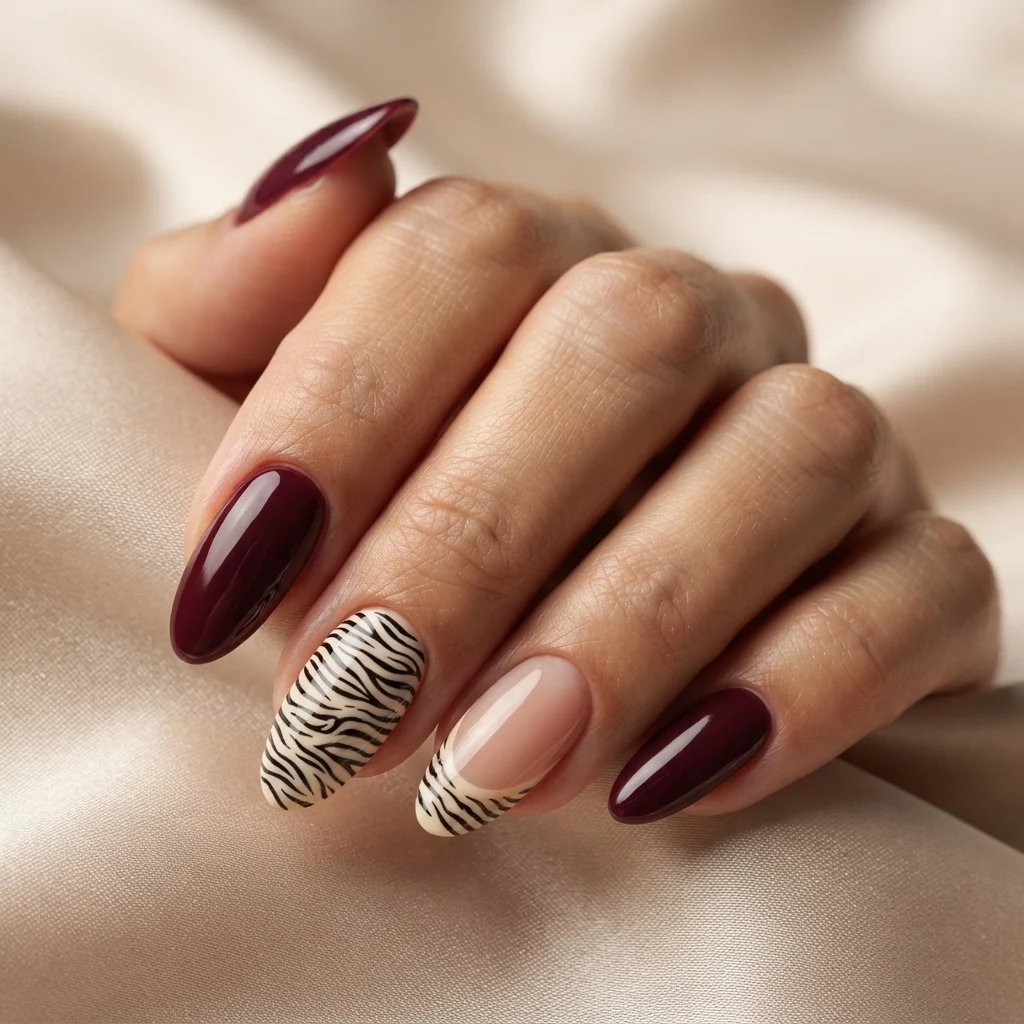
Pair rich burgundy polish with one ivory-and-black striped accent nail. The wine shade does most of the work, while the print introduces a contrasting detail.
For a more elaborate version, make the ring finger fully striped and give the middle finger a striped French tip. Keep the remaining nails solid burgundy so the set still has a clear main color.
Medium or long almond nails give this combination an elegant shape, although tapered square nails work beautifully if you prefer a more defined edge. A glossy finish makes the dark polish look especially rich.
Choose either a cool wine red or a warmer brown-red and repeat that shade consistently. Mixing several almost-matching burgundies can look accidental unless the tonal variation is deliberate.
This is a useful option for holiday dinners and winter evenings when you want a dressed-up manicure without snowflakes, ornaments, or other literal seasonal artwork. For related color inspiration, see these burgundy nail art ideas.
5. Silver Magnetic Zebra Nails
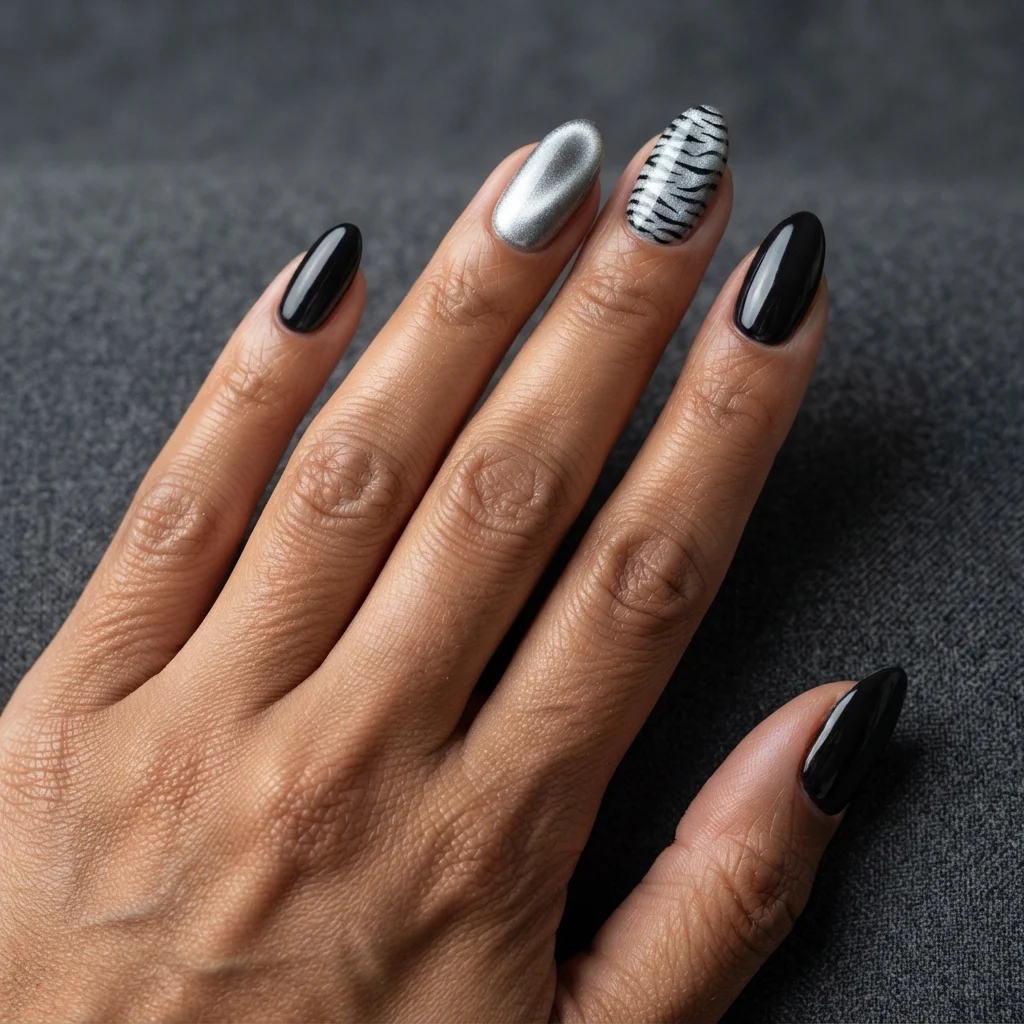
A silver magnetic base changes the design as the light moves across your hand. Fine black stripes sit over the shimmer, creating a contrast between the reflective foundation and the flat, graphic artwork.
The pattern looks clearest when the magnetic effect remains visible between the markings. Covering most of the silver with thick black lines can hide the finish you chose in the first place.
Try the effect on two accent nails, with the remaining fingers painted glossy black or finished in plain silver magnetic polish. Medium almond nails provide enough room for both the shimmer and the stripe pattern.
For a salon appointment, specify whether you want a broad velvet glow or a concentrated reflective line. Those effects create different backgrounds beneath the same artwork.
A silver magnetic polish and a compatible nail magnet can help create this finish. Check whether the polish is regular lacquer or gel before buying, since application and drying or curing requirements differ.
Our cat-eye nail polish guide explains more of the design options available with magnetic finishes.
6. Blush Pink With Deep Berry Stripes
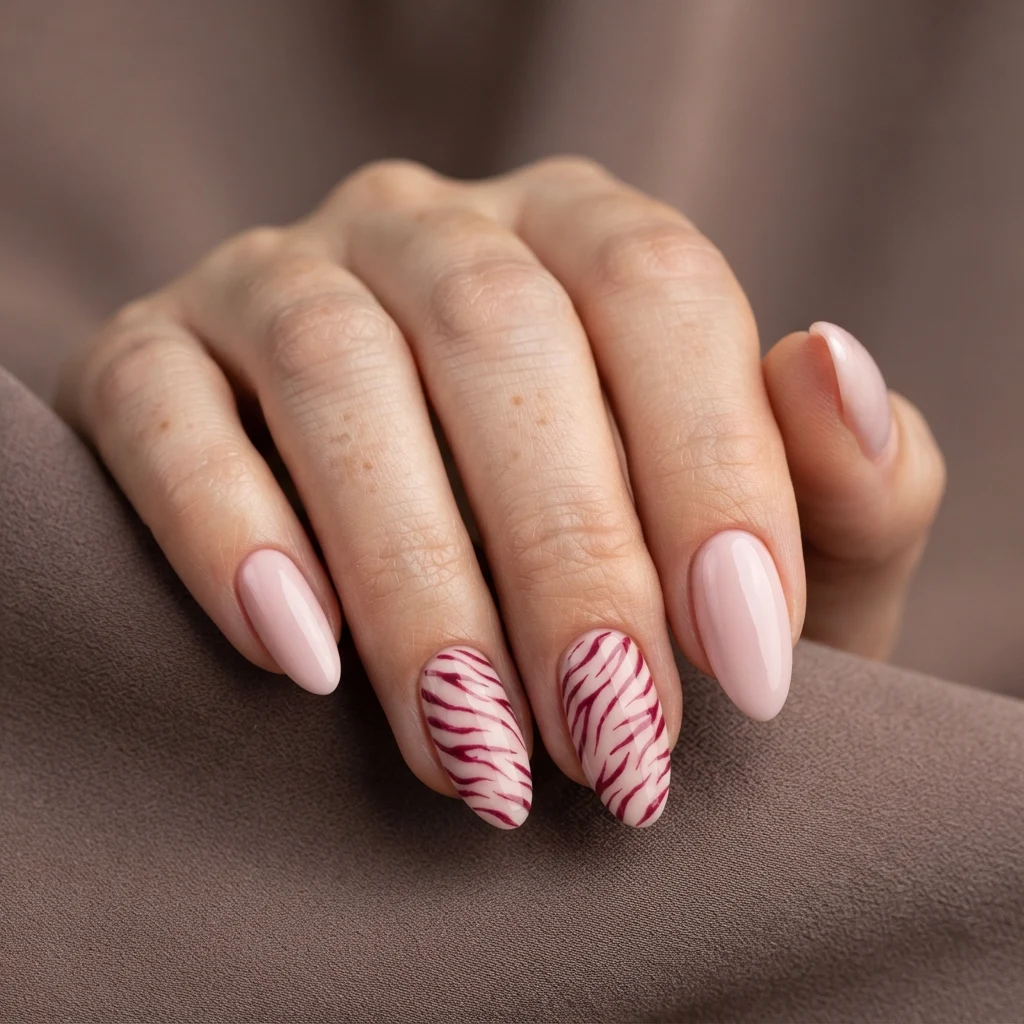
A pale blush base keeps this manicure soft, while deep berry zebra stripes decorate two accent nails. The remaining nails stay plain pink, giving the pattern room to stand out.
Keep the berry color dark enough to remain distinct from the base. Two similarly light pinks can make the markings look faint rather than intentional.
A full patterned set works well on medium almond nails, but you can soften it further by leaving two fingers solid blush. Another option is to concentrate the pattern toward the tips, letting it become less dense as it approaches the center of the nail.
This design benefits from restraint elsewhere. A smooth surface and glossy finish allow the color combination to stand on its own.
If you want a small decorative addition, choose one tiny metallic detail on a plain nail rather than placing gems throughout the striped sections.
7. Olive Zebra Nails With Champagne-Gold Stripes
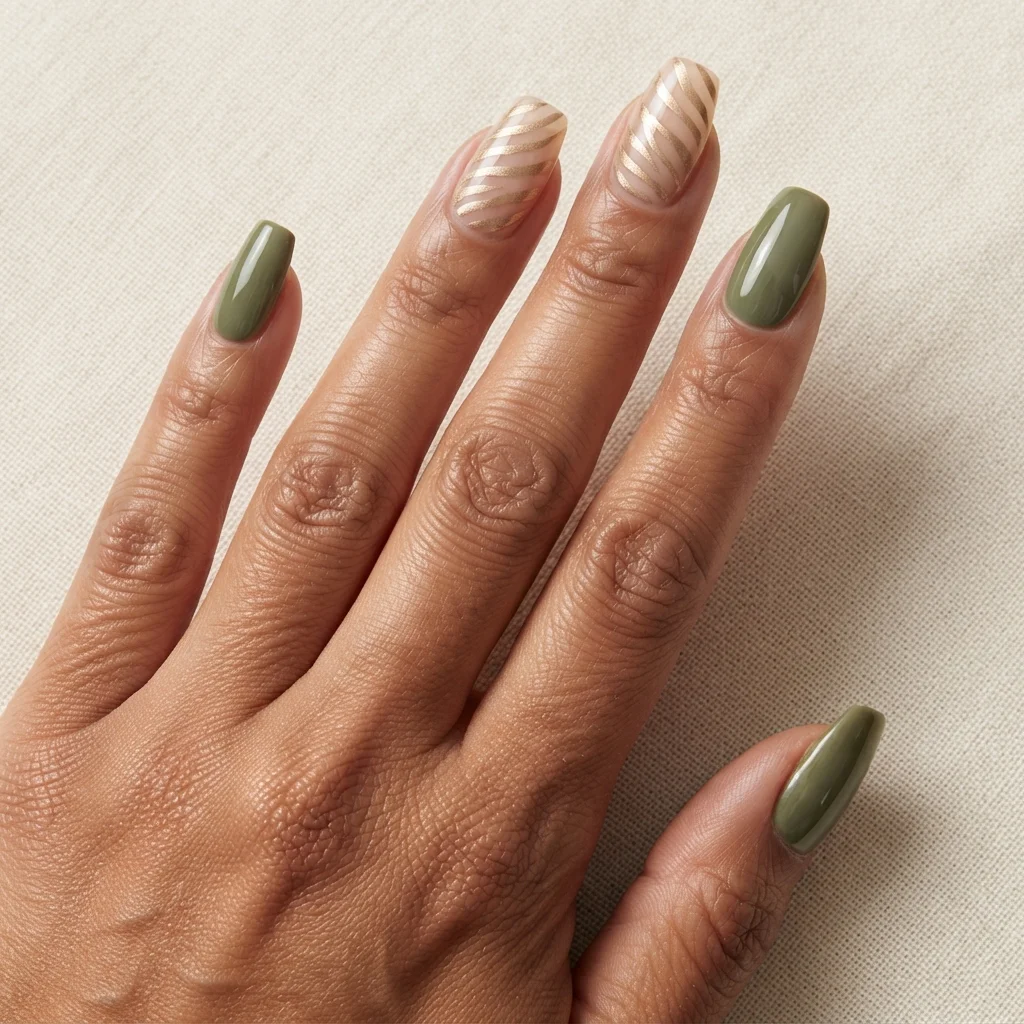
Olive and champagne gold bring a different mood to zebra nails. Paint most fingers a muted olive, then use a sheer beige or pale cream base for one or two gold-striped accents.
A lighter metallic shade gives the pattern definition without introducing bright yellow gold. The effect can be subtle in soft lighting and more reflective outdoors.
For clear markings, ask for metallic gold striping with tapered ends. A scattered glitter polish may not create the same defined lines, so show your nail artist the finish you have in mind.
Medium tapered square nails give this version a structured appearance. Almond nails create a softer silhouette, particularly when the gold pattern follows a slight diagonal.
Keep extra decoration minimal. The combination already includes color contrast, animal print, and a reflective finish. Plain olive nails give those details enough room to stand out.
This palette works with cream, brown, black, and olive clothing, making it a practical choice if those colors appear frequently in your wardrobe.
8. Short Zebra Nails With Subtle Side Stripes
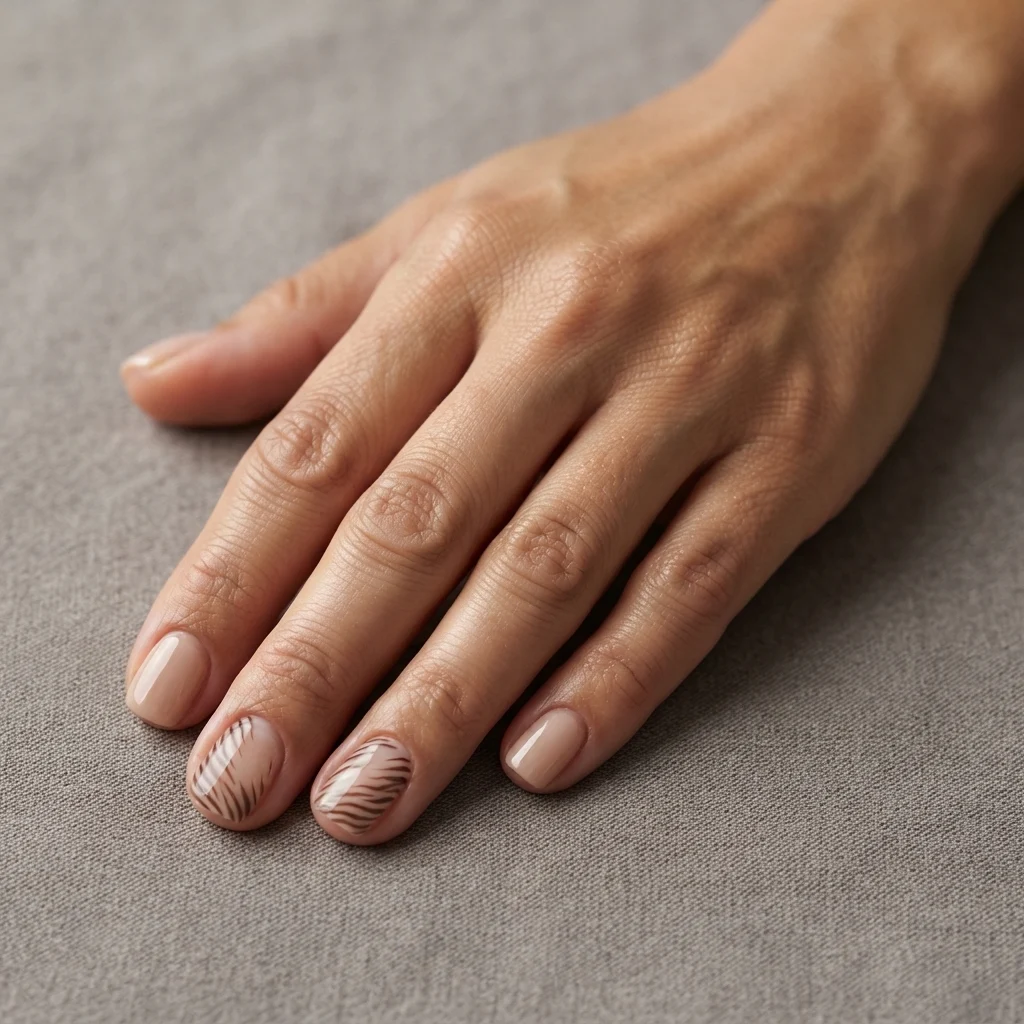
Short nails can carry the pattern without squeezing a miniature full set onto every finger. Use a sheer nude base, then place a small section of black or chocolate stripes along one side of two accent nails.
Let the markings enter from the sidewall and taper toward the center. Keeping part of the nail visibly clear makes the layout feel deliberate rather than unfinished.
Short oval and squoval shapes work well here. The stripes should be scaled to the nail: a few fine, distinct markings usually read more clearly than a dense cluster.
If painting tiny lines feels frustrating, small zebra nail decals or water-slide transfers may offer an alternative. Check the dimensions before purchasing, since a large motif can lose its shape when trimmed to fit.
This is also a useful reference for anyone who wants animal print but prefers a manicure that doesn’t draw attention from across the room.
9. Black French Tips With a Zebra Detail
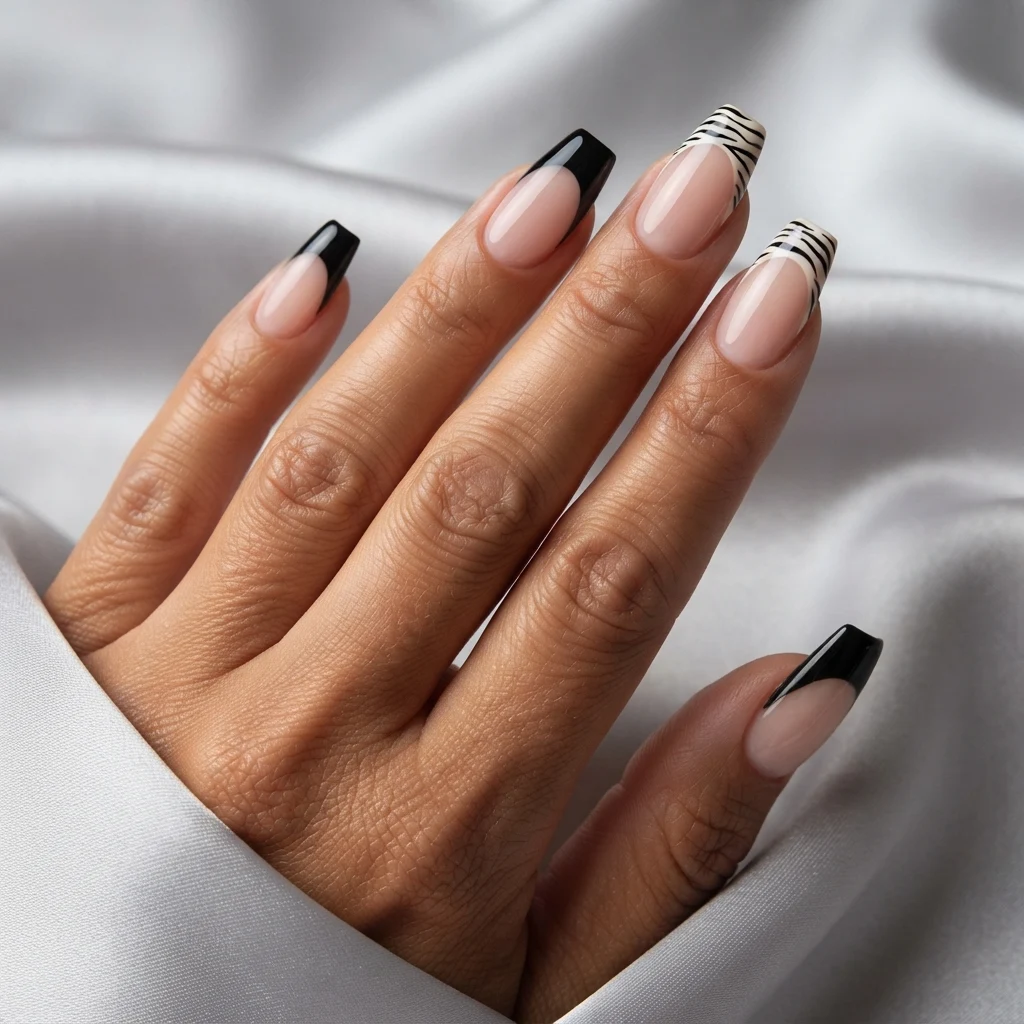
For a darker interpretation, combine glossy black French tips with a narrow zebra section on selected fingers. The sheer base keeps the manicure from looking like a full black set, while the print adds texture to the tips.
Try plain black tips on the thumb, index, and pinky, with zebra tips on the middle and ring fingers. Keep the depth of the French sections similar so the different artwork still feels connected.
Long almond or coffin nails give this design room to develop. On shorter nails, simplify the print and use just one accent rather than compressing several features together.
A slim silver line can separate the patterned tip from the sheer base, but it is optional. If you add it, keep the same silver finish throughout the set.
The result suits evening outfits particularly well: strong enough to feel dressed up, with enough visible base color to preserve some lightness.
10. Zebra Nails With a Single Cherry-Red Accent
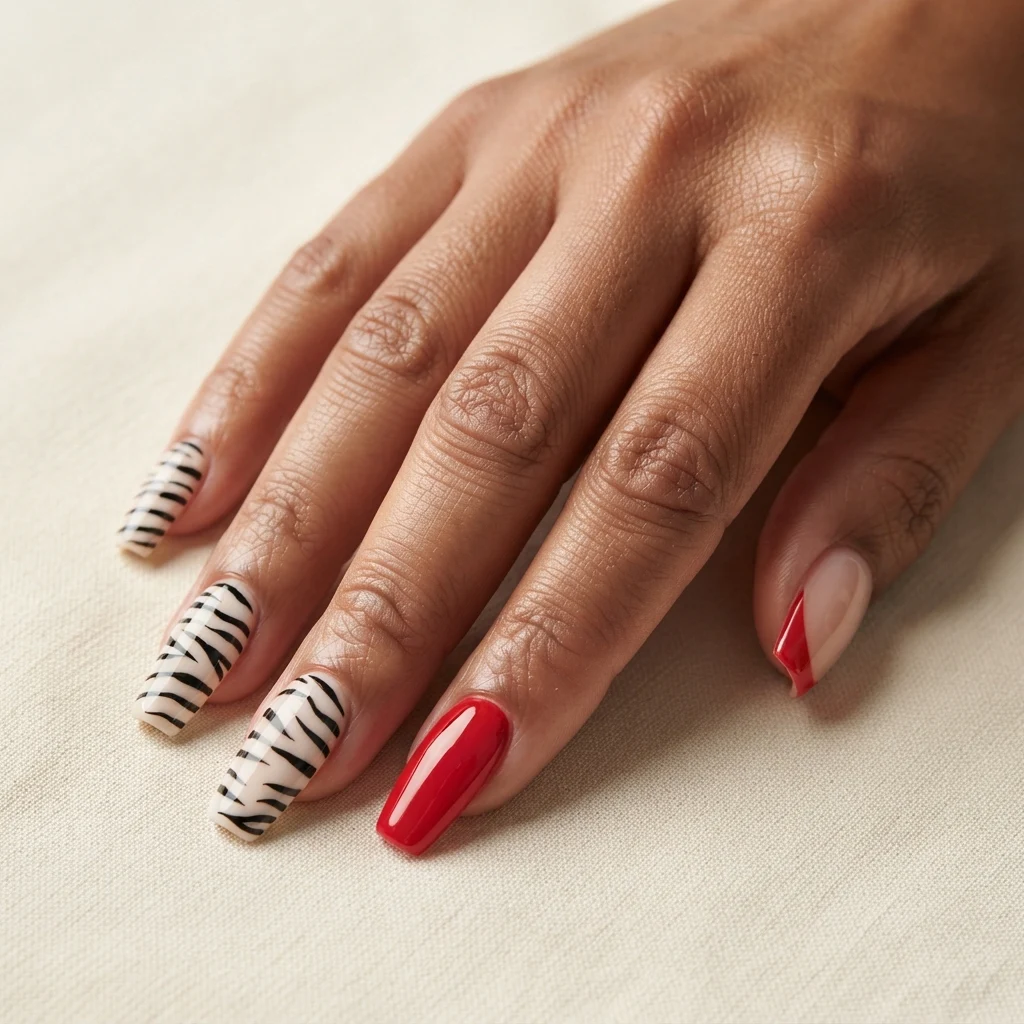
Choose black-and-white print as the main design, then interrupt it with one glossy cherry-red nail. A single contrasting color gives the manicure a focal point without introducing several competing patterns.
You could make the ring finger solid red and repeat a very thin red French edge on the thumb. That small repetition helps the accent feel intentional.
Long square nails create a bold version, while medium almond nails make the same color arrangement a little softer. Keep the print consistent in scale across the patterned fingers.
The red should look clearly different from black. A very deep shade can appear almost black in indoor lighting, reducing the contrast that makes this design distinctive.
A opaque cherry-red regular nail polish can also be used separately for a simple manicure between patterned sets. Look for the finish you prefer—cream rather than shimmer if you want the clean contrast described here.
How to Paint Zebra Nails at Home
The simplest starting point is one accent nail. Once you like the spacing and brush pressure, repeat the idea on other fingers without trying to duplicate every line exactly.
You’ll need a suitable base coat, your background color, a contrasting polish, a fine liner brush, and a compatible top coat.
- Apply your base and background color. Follow the product directions and allow regular polish to dry sufficiently before painting the details.
- Place a few main stripes. Start from alternating sides of the nail, using gentle curves rather than straight horizontal bars.
- Taper each marking. Reduce pressure and lift the brush as you reach the end of the line.
- Add one or two smaller branches. Use them sparingly so the pattern retains visible gaps.
- Check the balance. Look at the nail from a normal distance before filling another space.
- Finish carefully. Let regular-polish artwork dry sufficiently before applying top coat to reduce dragging.
A clear top coat compatible with your polish system completes the supplies. Avoid repeatedly brushing over the same section of artwork, particularly if the contrasting lines are still soft.
With gel products, follow the manufacturer’s layer and curing instructions, use the specified compatible lamp, and keep uncured product off the skin.
Hand Painting, Stamping, or Decals?
Hand painting gives you the most freedom to change stripe width and placement. It is useful when you want markings that follow a specific French tip or curve around an accent.
Stamping transfers a prepared pattern from a plate. It can be helpful for repeated detail, although positioning and the choice of stamping polish affect the result.
Decals offer another route when fine brushwork isn’t your preference. Choose a size that fits the nail and follow the application instructions, including any sealing requirements.
What to Ask for When Booking Zebra Nails
Bring a clear reference photograph, then describe four details: shape, length, color, and placement.
For example:
“I’d like medium almond nails with a sheer pink base, black-and-white zebra French tips on two fingers, and plain black tips on the others. Please keep the stripes fine and irregular.”
Ask whether the artwork is priced per nail or as a full set. Magnetic finishes, extensions, metallic detailing, and additional decoration may affect the appointment time and cost.
If you’re combining references, identify what you want from each image. You might like the shape in one photo and the color placement in another; explaining that prevents the artist from having to guess.
Frequently Asked Questions
Do zebra nails work on short nails?
Yes. Short nails can suit fine stripes, side sections, or one patterned accent nail. Keeping the markings small enough to leave visible base color helps the design remain clear.
What colors can I use besides black and white?
Chocolate and ivory, blush and berry, olive and champagne gold, or silver and black all create distinct versions. Choose enough contrast for the stripes to remain visible in everyday lighting.
Can I create the pattern with regular nail polish?
Yes. You can paint the stripes with regular polish and a fine brush, or use suitable stamping products or decals. Gel isn’t required for the basic design.
What is the difference between zebra and tiger nail art?
Zebra-inspired patterns usually use irregular, branching stripes with pronounced gaps between them. Tiger-inspired designs often pair dark stripes with warm orange or tan backgrounds. Nail-art interpretations can overlap, so a reference image communicates your preference more clearly than the name alone.
How can I make animal print look more understated?
Limit the print to one or two nails, choose brown and ivory instead of stark monochrome, and leave the remaining fingers plain. A sheer base or a patterned French tip can also reduce the amount of artwork.
Find Your Version of the Print
The best zebra nails for you depend on how much contrast and detail you enjoy wearing. Chocolate accents offer a soft introduction, classic French tips keep the pattern contained, and magnetic silver or rich burgundy take it into evening territory.
Choose one main feature first. Then let the supporting colors, shape, and finish make that feature easier to see.
Save your favorite look, note the length and placement you prefer, and bring those details to your next appointment. A clear plan leaves plenty of room for your nail artist to create a set that feels personal.

Amber Javier writes about wearable nail ideas and practical nail care at Dazzle Me Nails. Her articles explore manicure designs, techniques, and care tips to help readers choose their next look. Contact: info@dazzlemenails.com